RPL is only accessible on decentralized exchanges (DEXes). This guide will show you the best ways to go about purchasing RPL while getting the best price.
How to Use Your Wallet with DeFi
Currently, RPL is only available on the Ethereum Mainnet, so be sure to connect your wallet to that network!
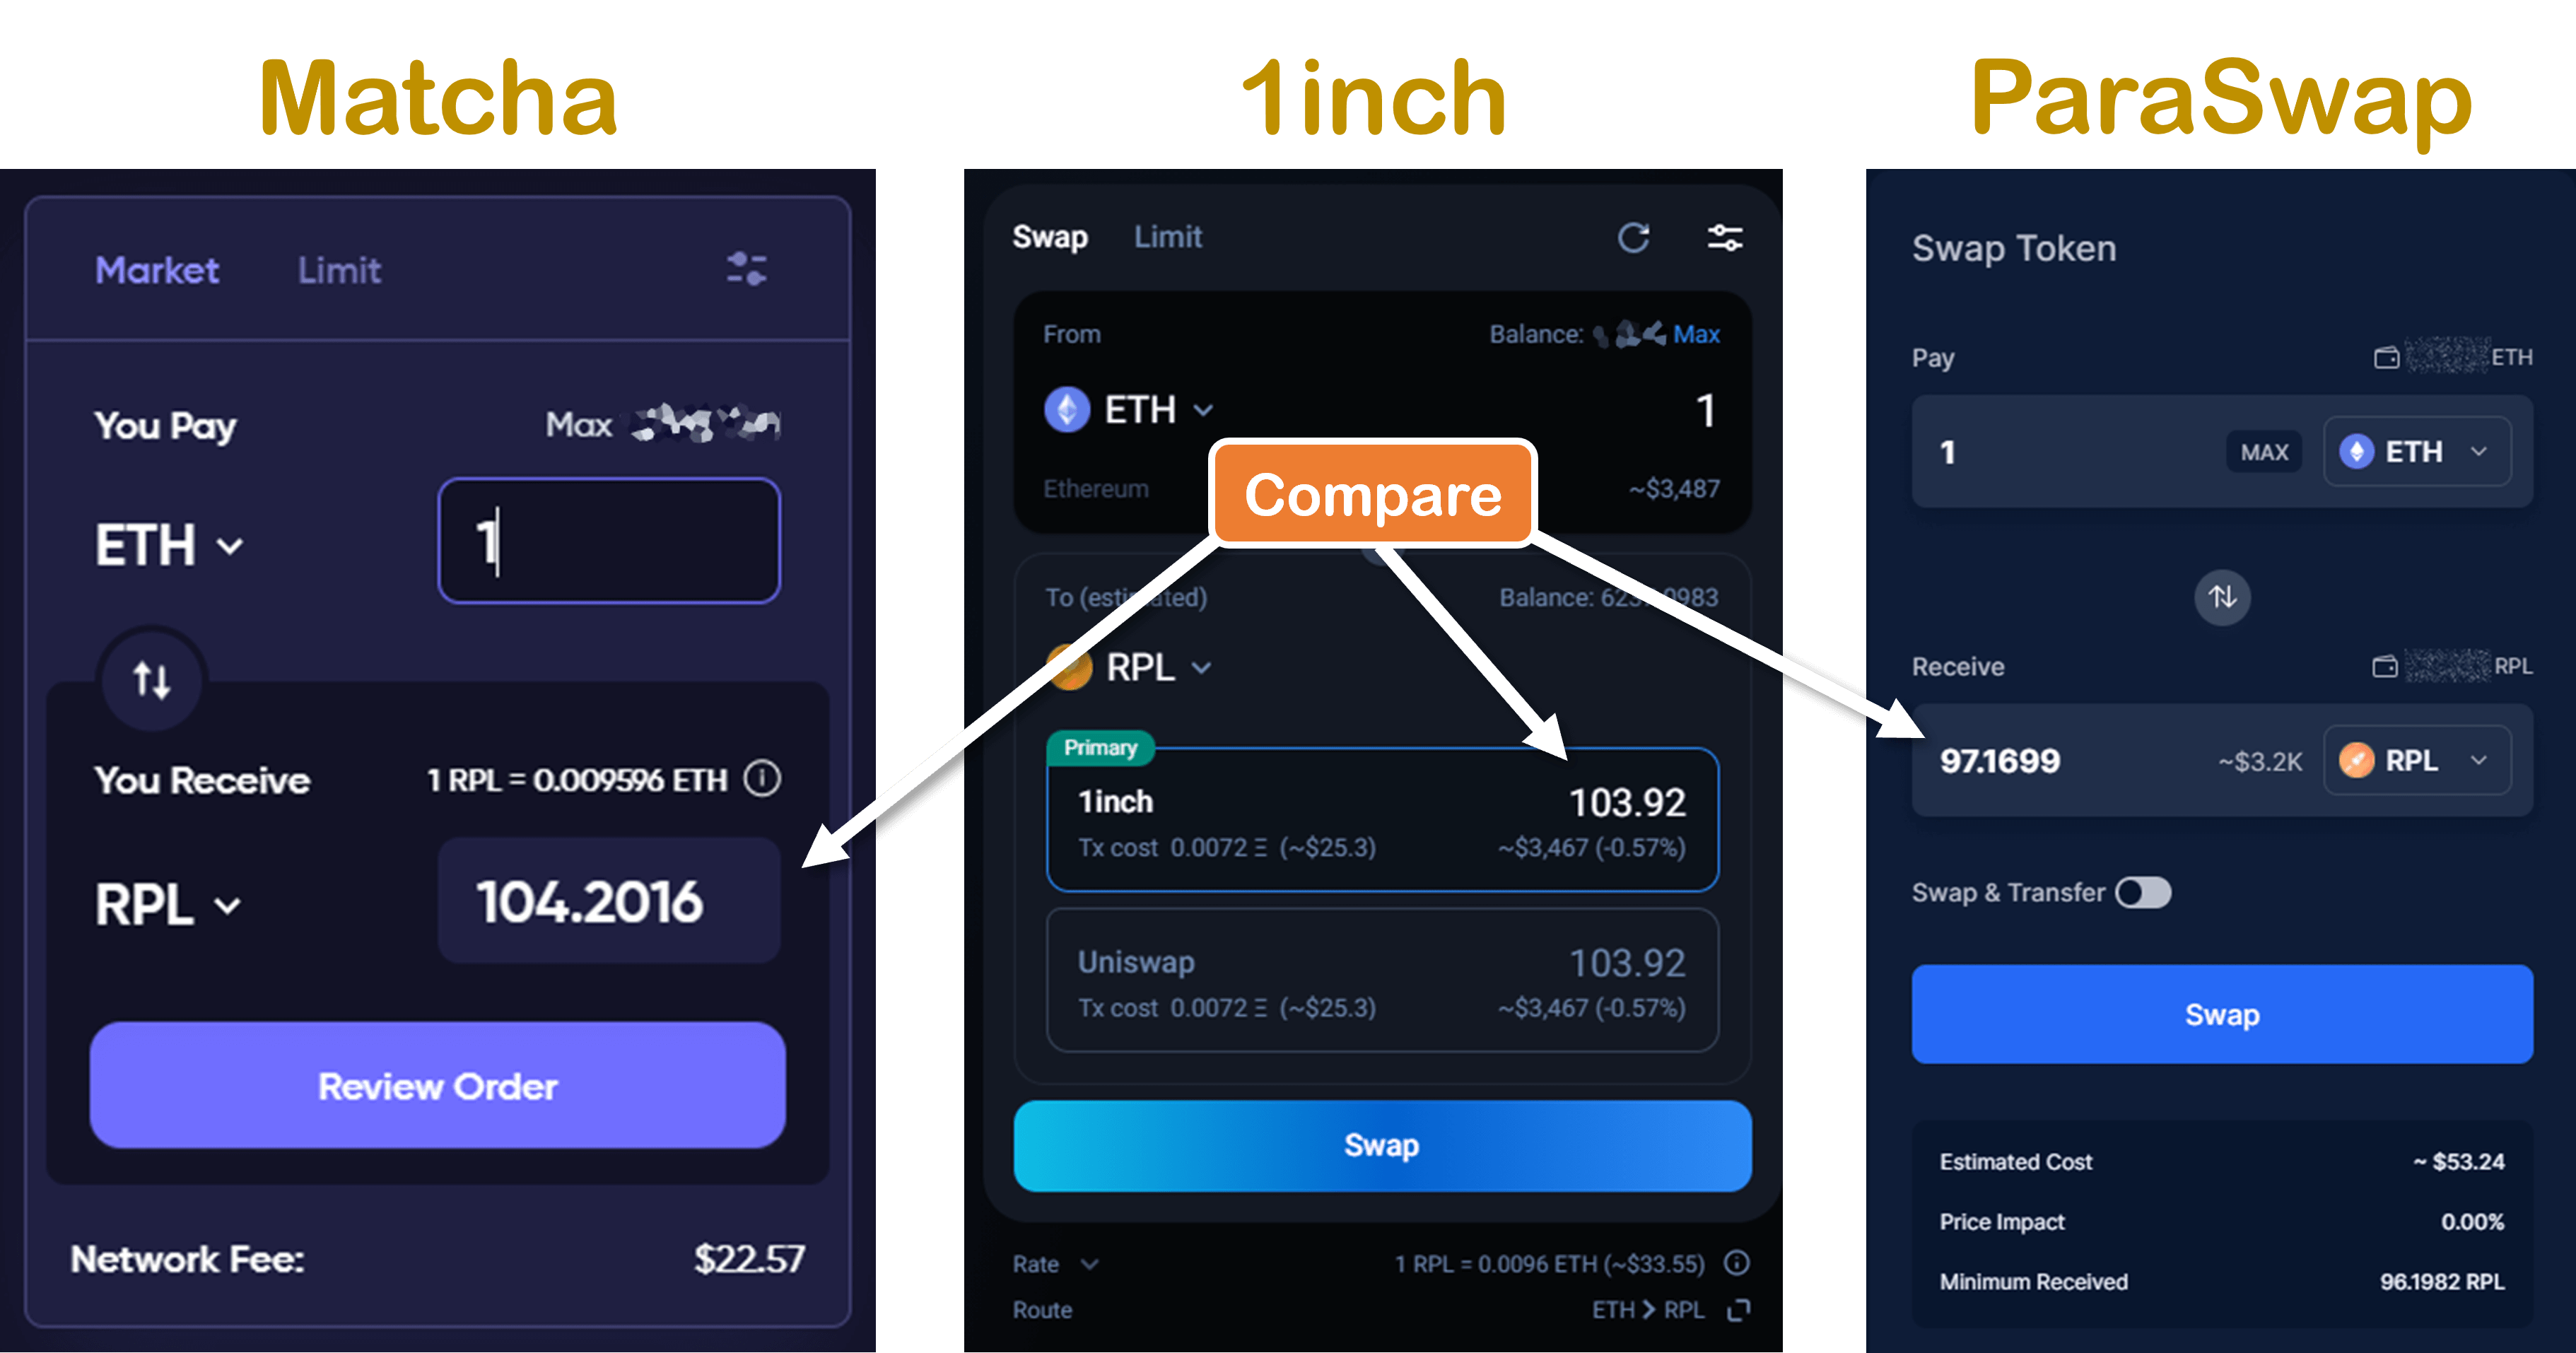
Compare Aggregator Rates
What is an aggregator and why use it?
An aggregator looks at many different sources of liquidity in order to get you the best deal possible, even splitting up your transaction if needed. By default, they also allow hops between different pairs that don’t have liquidity, for example, LINK to RPL.
Which aggregator should you use?
While all pretty similar, you may find better deals from different sources, so it could be worth checking between them. The main 3 you should consider are:
- Matcha: Safe and often used, it is one of the cheapest sources that utilizes the 0x system to find liquidity from 50 sources. Matcha places no limit on positive slippage and manages gas well.
- 1inch: Safe and often used, it is the aggregator with the largest source of liquidity pulling from over 65 sources. 1inch does not allow for positive slippage but this is rare to non-existent for RPL trades due to low trade volume.
- Note: 1inch is currently restricting access to US users.
- Paraswap: The smallest of the three, ParaSwap is another trusted aggregator option with 34 sources and it’s own routing system which is occasionally more efficient. It retains 50% of any positive slippage.
Note: While Metamask has a built-in swap, it can charge up to 0.875% in fees and sources the same information as the other sites suggested so we recommend not to use it.
- Check Matcha, 1inch, and ParaSwap to see which one will give you the best price:
- Select the aggregator that you trust and will give you the best rate then proceed to the next step for making the exchange.
Making the Exchange
Jump to section:
Using Matcha
- Go to the Matcha dApp
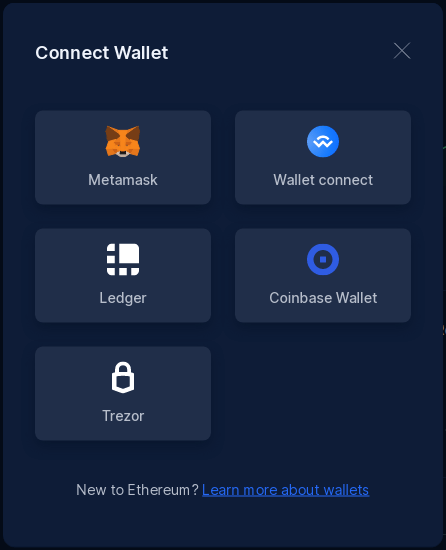
- Connect your wallet
- Click the menu on the top-right then click “Connect Wallet”
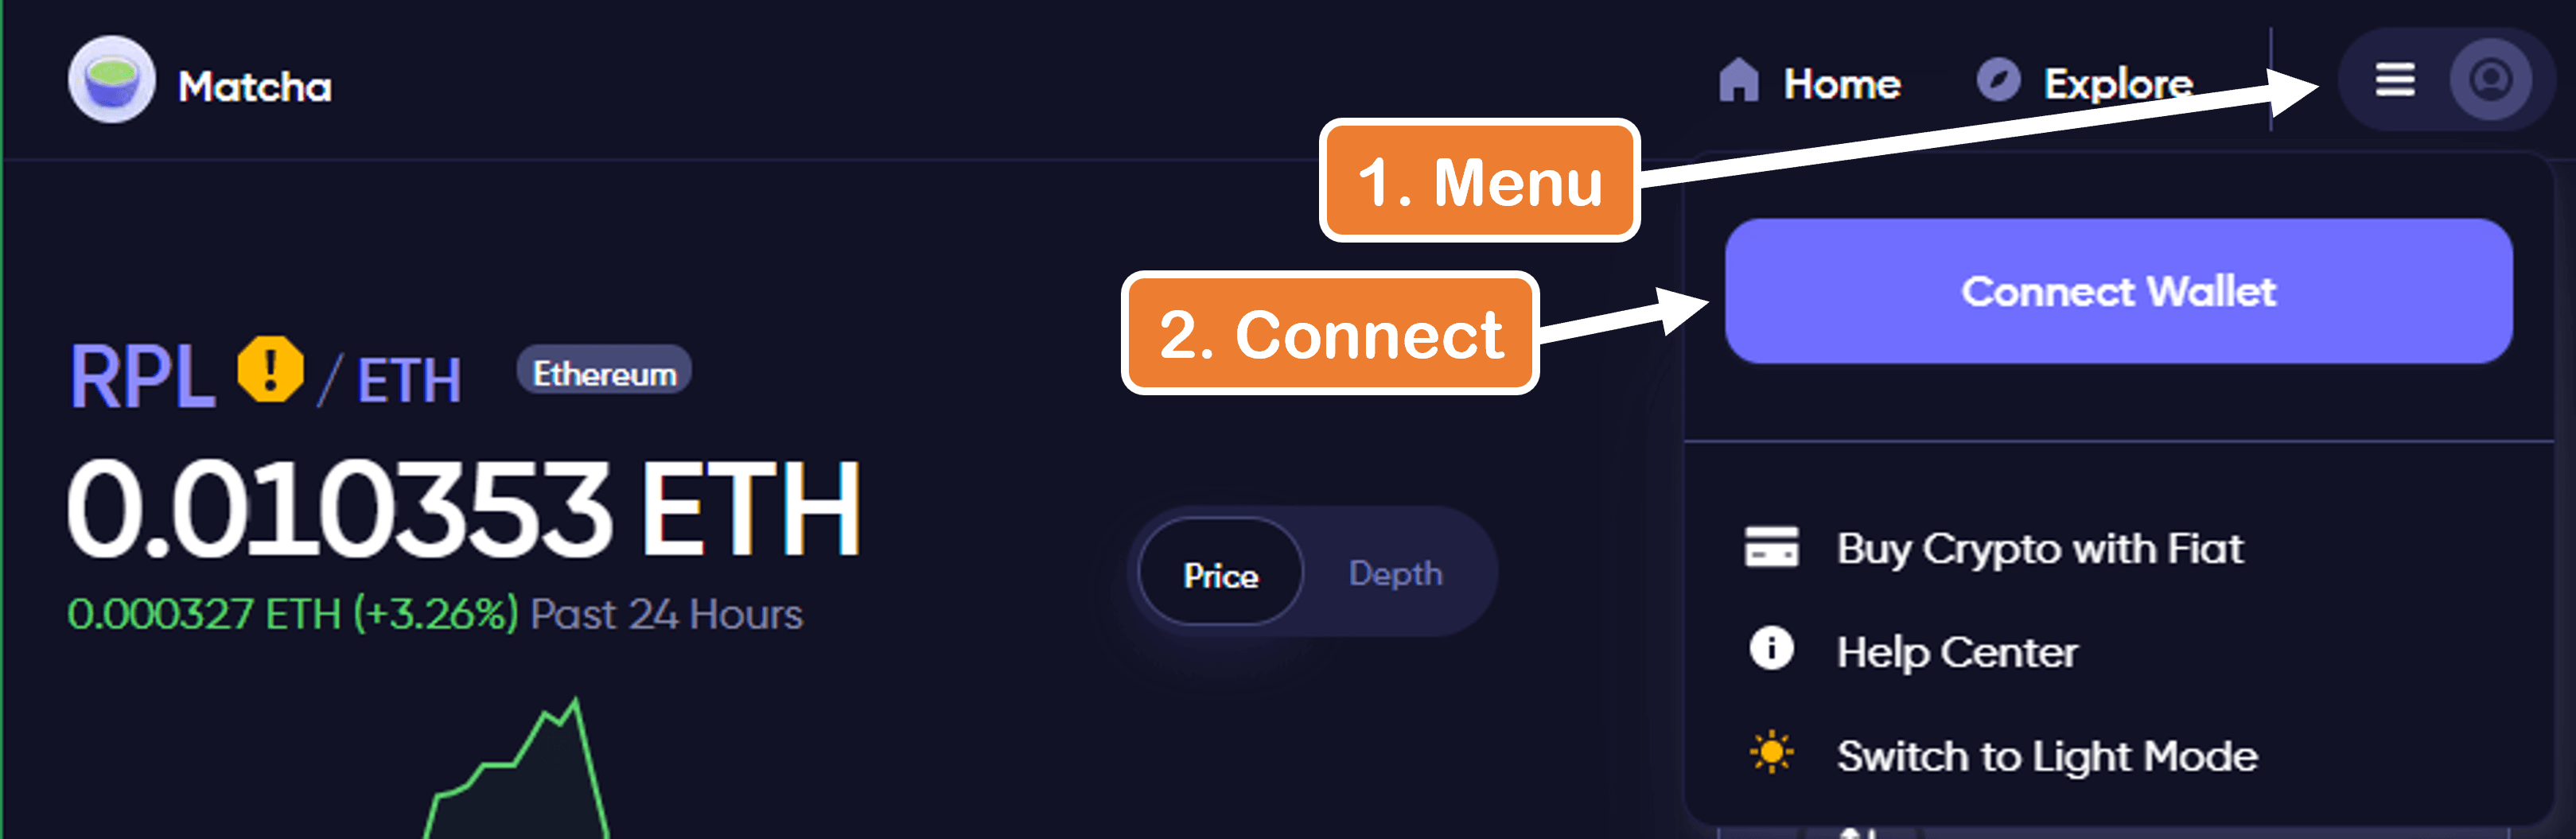
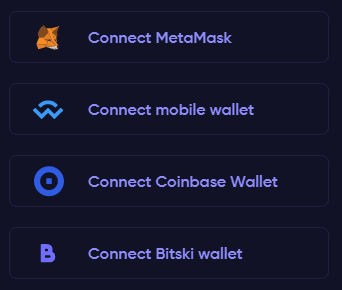
- Connect using the correct option for your wallet
- Click the menu on the top-right then click “Connect Wallet”
- Go to the RPL token page
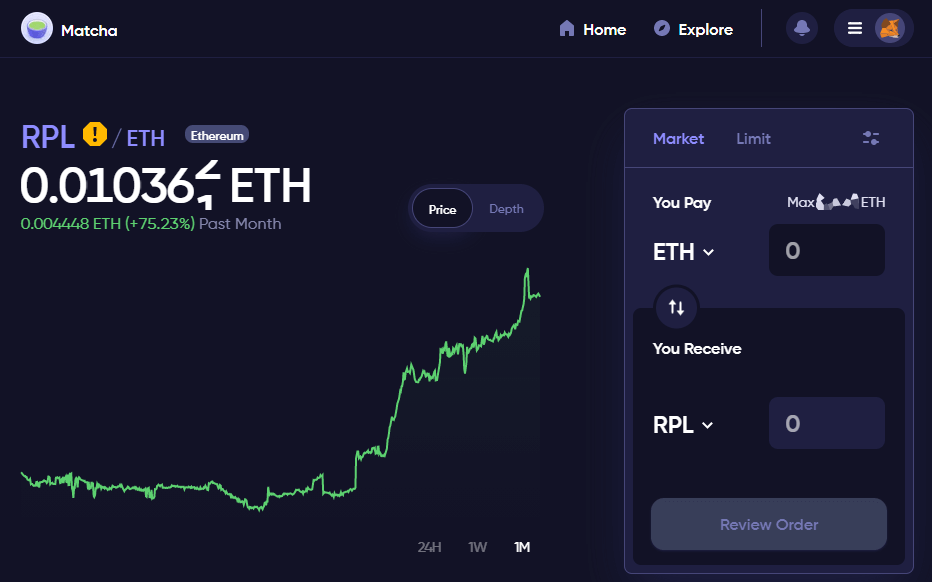
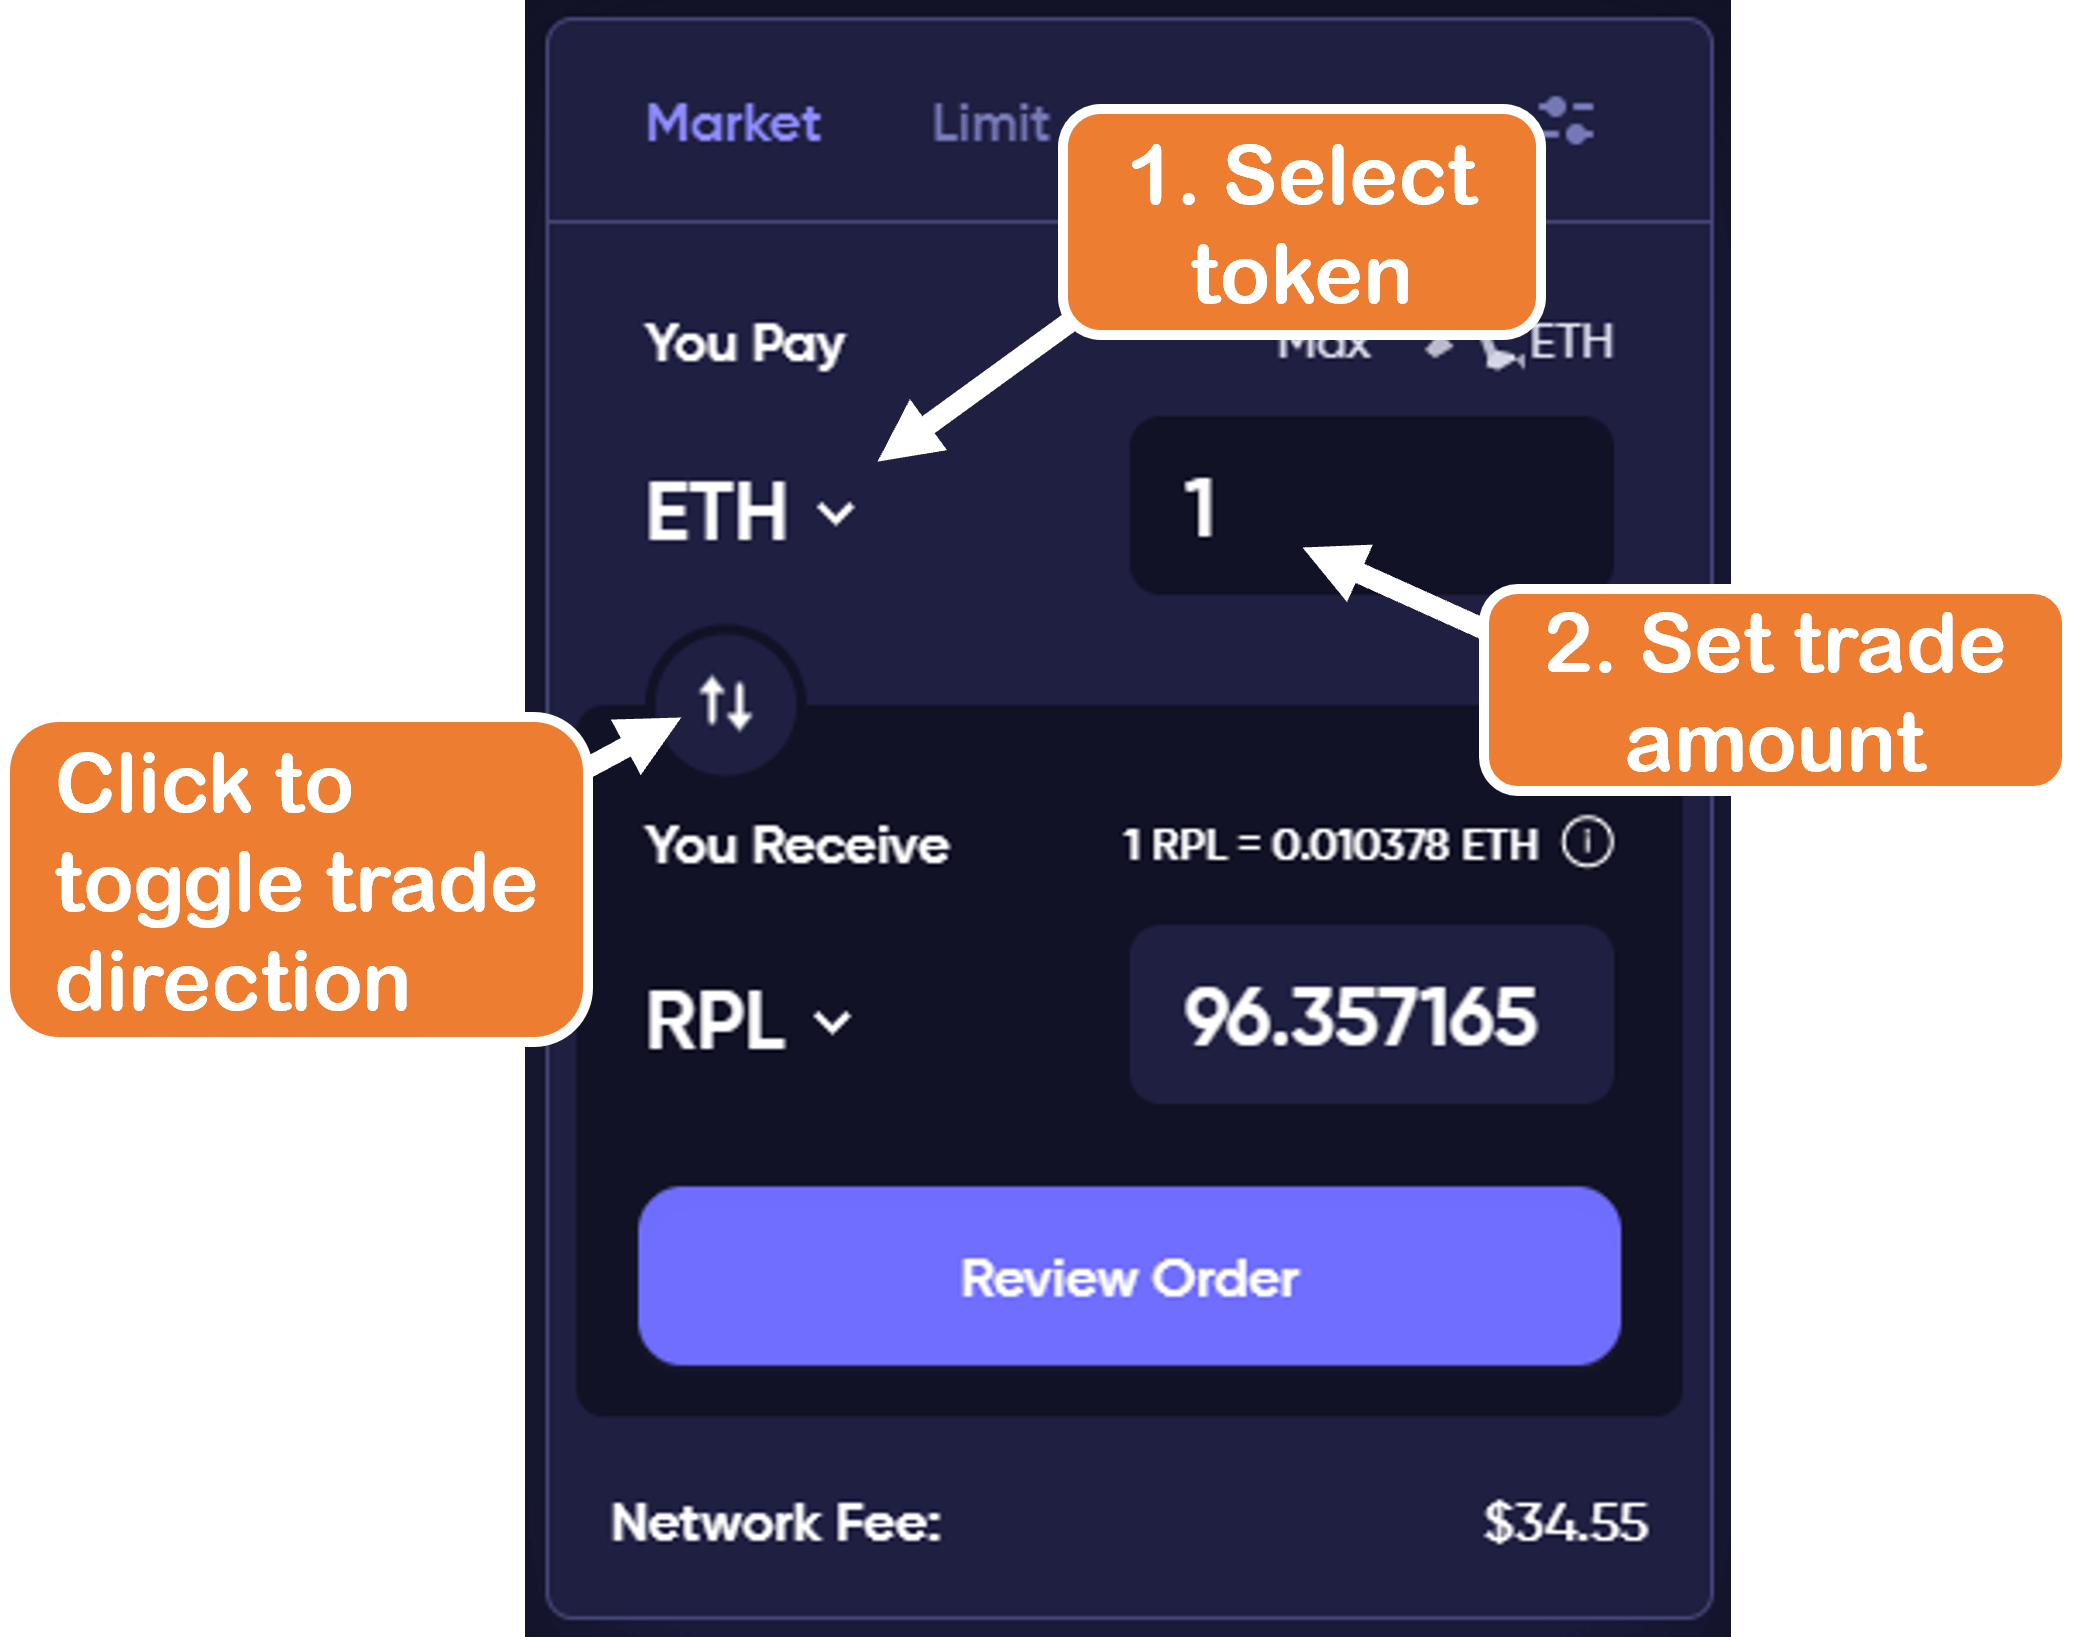
- Choose your trading pair and amount
- Select the payment token under “You Pay”
- Fill in the amount desired to trade for RPL
- Note: If you want to sell RPL instead (or RPL is the top token), click the
 icon to toggle the trade direction
 - Note: Putting a specific receipt amount of the “You Receive” token costs more gas for the transaction, so it’s beneficial to always set the “You Pay” amount instead)
- Matcha will generate a quote from its list of liquidity sources
- To check the routing it suggests, hover over the
 next to “1 RPL = 0.xxxx ETH”
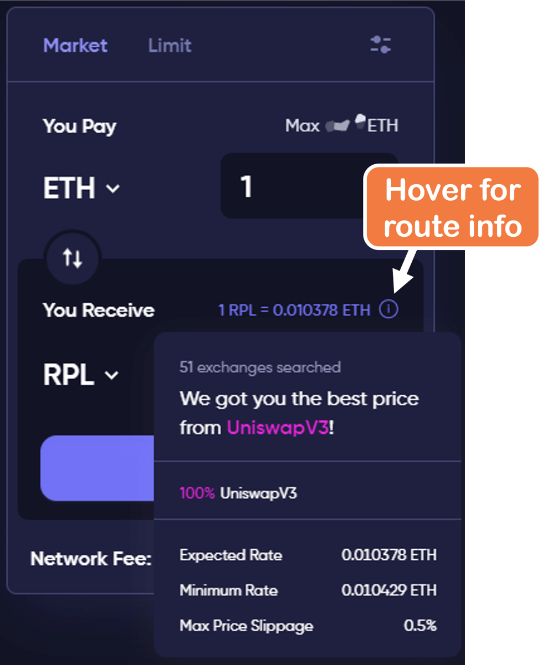
- To check the routing it suggests, hover over the
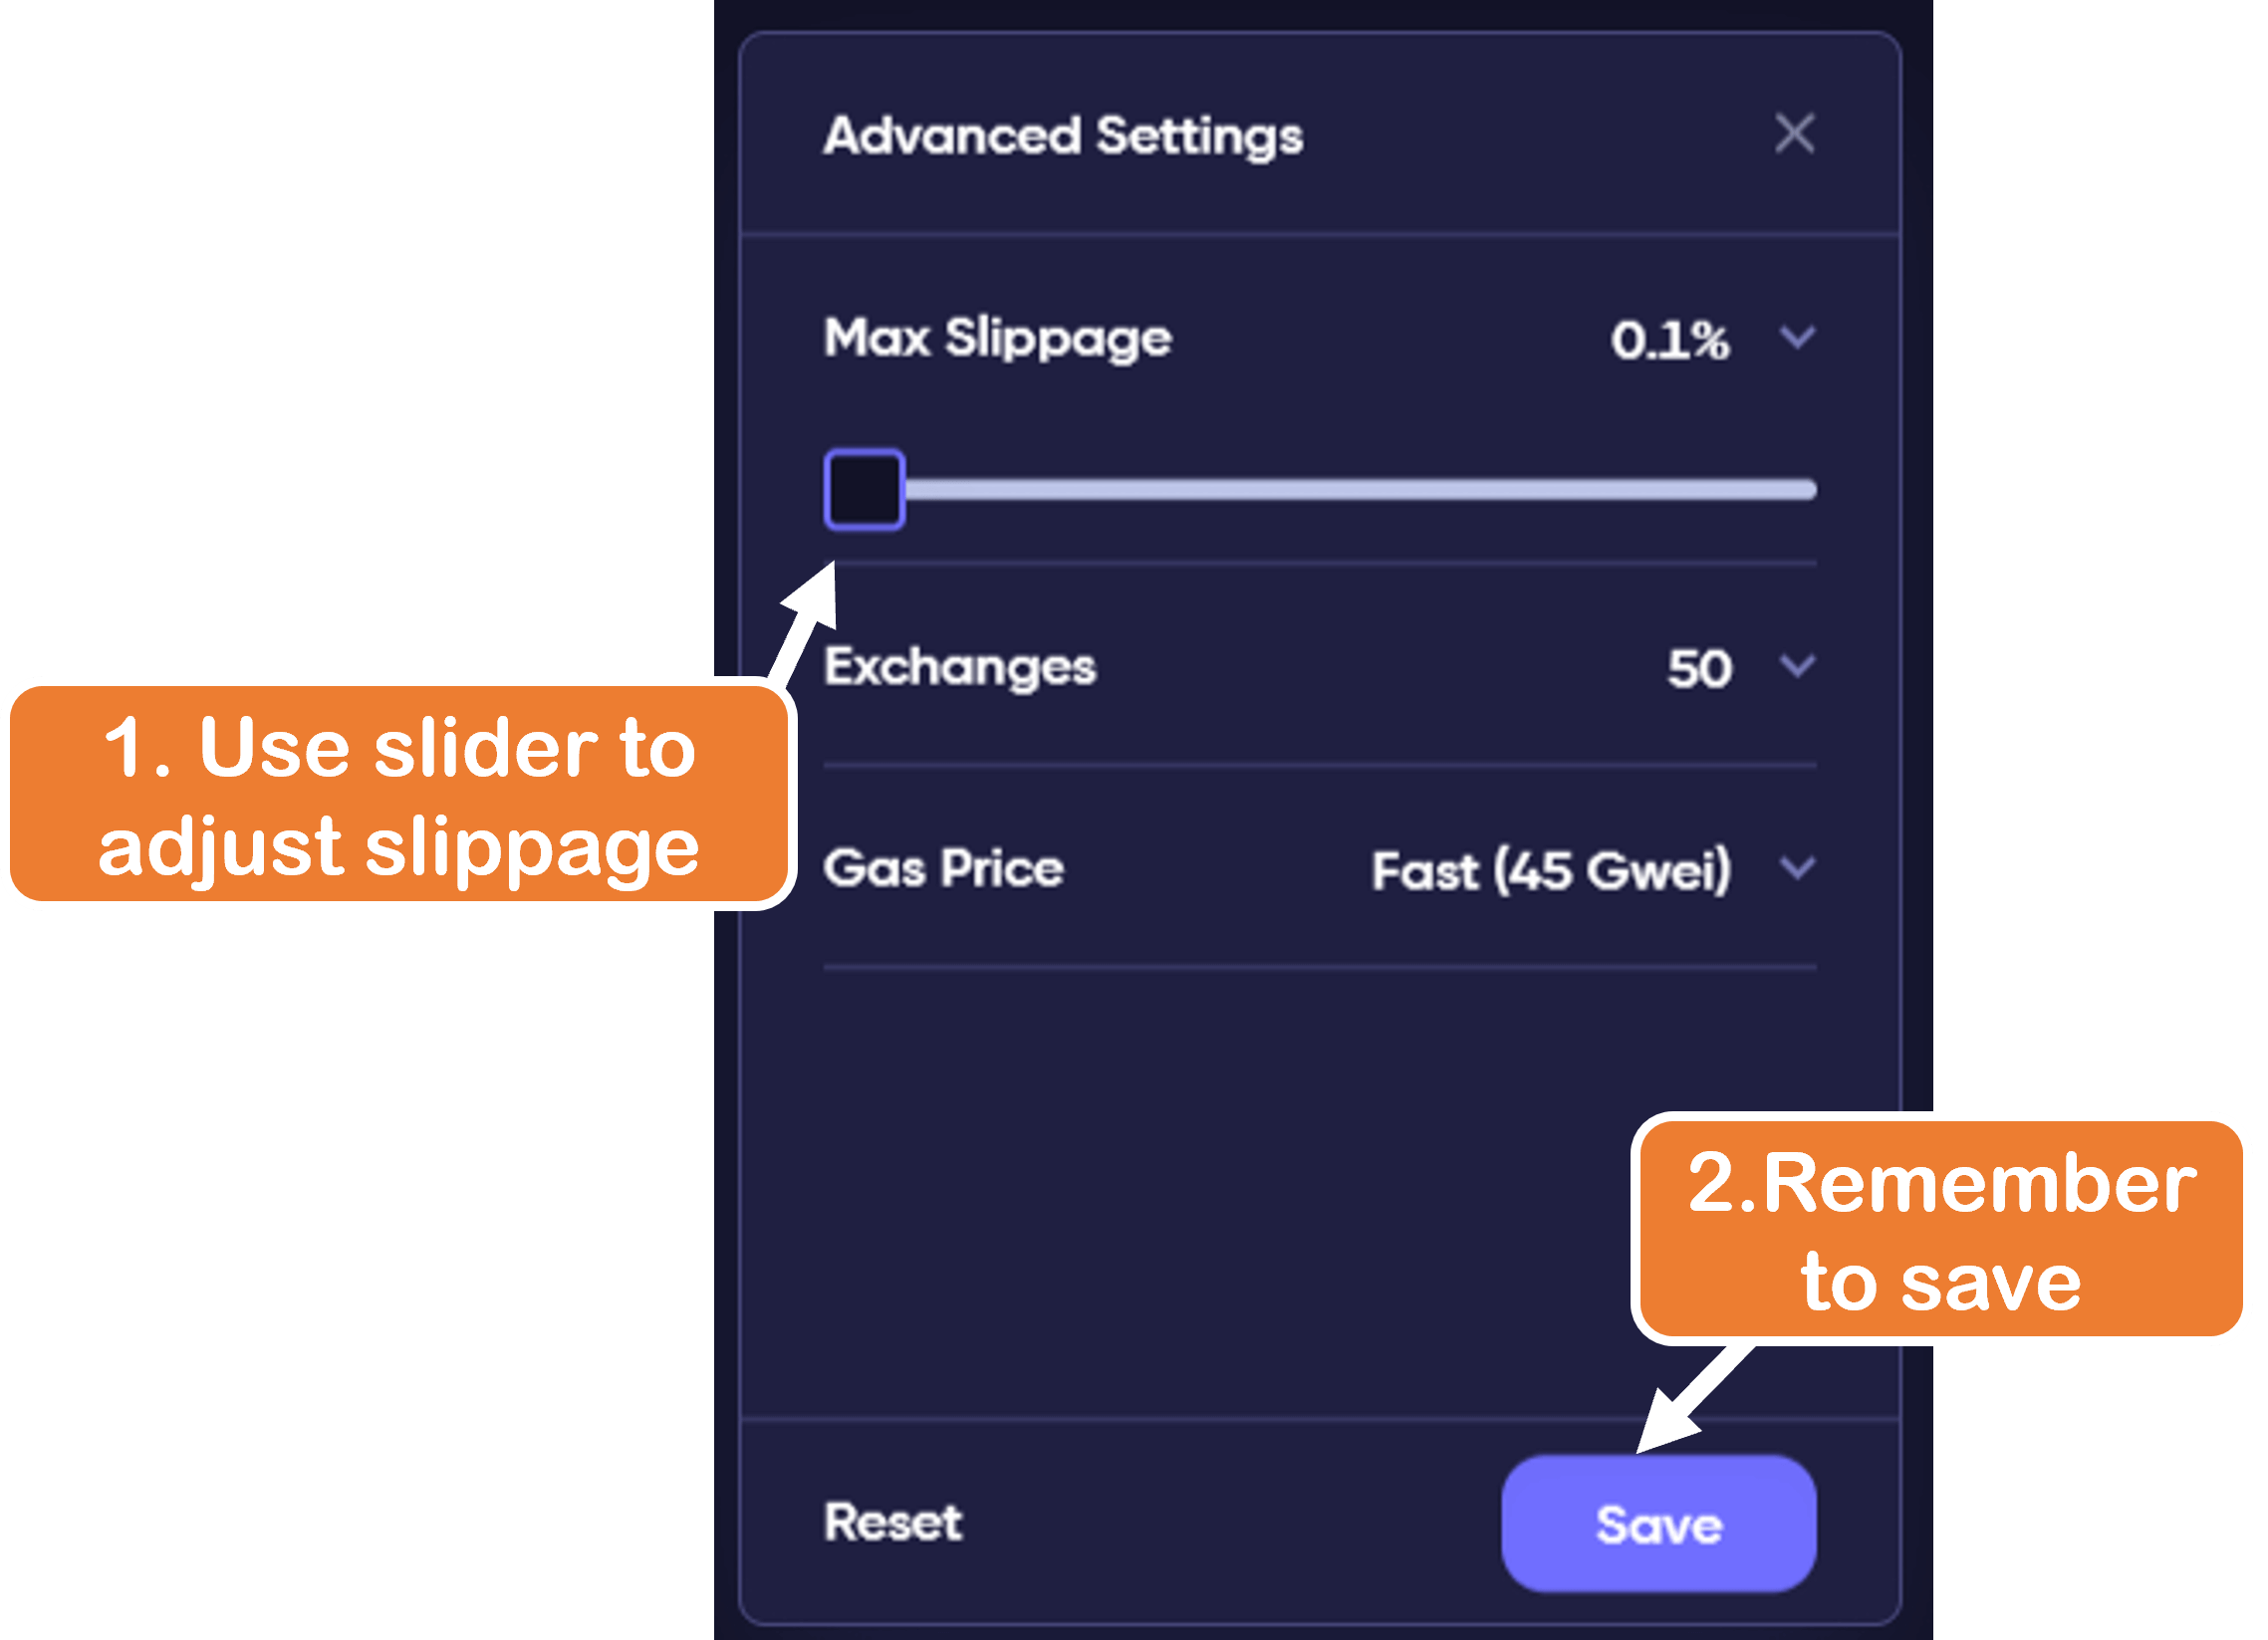
- WAIT! Before finalizing the order, we want to adjust some of settings to save costs
- Click the slider icon on the top right of the trade window

- This is the setting page, we will want to review “Max Slippage” and “Gas Price”
Information on Slippage
Max Slippage defines how much your purchase price can vary from the quoted price; it sets an upper limit on the purchase/sell price.
- When liquidity is low, sandwich bots can more easily raise and lower the RPL price around your transaction, causing you to pay at a higher price than quoted
- Setting a low slippage would mean your transaction would fail if they moved price too much and thus their attack would fail, so they won’t even try it
- If liquidity is high or RPL is not frequently traded, it is not likely that the price will change much during the time of your transaction from natural demand so setting a low slippage is unlikely to cause a trade to fail while still protecting against sandwich attacks
- A good source for liquidity and frequency for the RPL/ETH pair is Uniswap V3 info page
- Generally, >1k RPL/tick or >50 ETH/tick is good liquidity and a trade every 10 minutes or longer is low frequency
- Click the slider icon on the top right of the trade window
- Set slippage to at least 0.5% and down to 0.1% if RPL volume is still low (see the expandable info above for determining this)
- Click “Save”
- Note: 0.5% slippage is the safest option for your transaction to succeed but at a higher risk of being sandwich attacked, while 0.1% is the safest option for avoiding a sandwich but at a risk of the transaction failing if you are unlucky enough for another high-priced buy/sell to occur before yours.
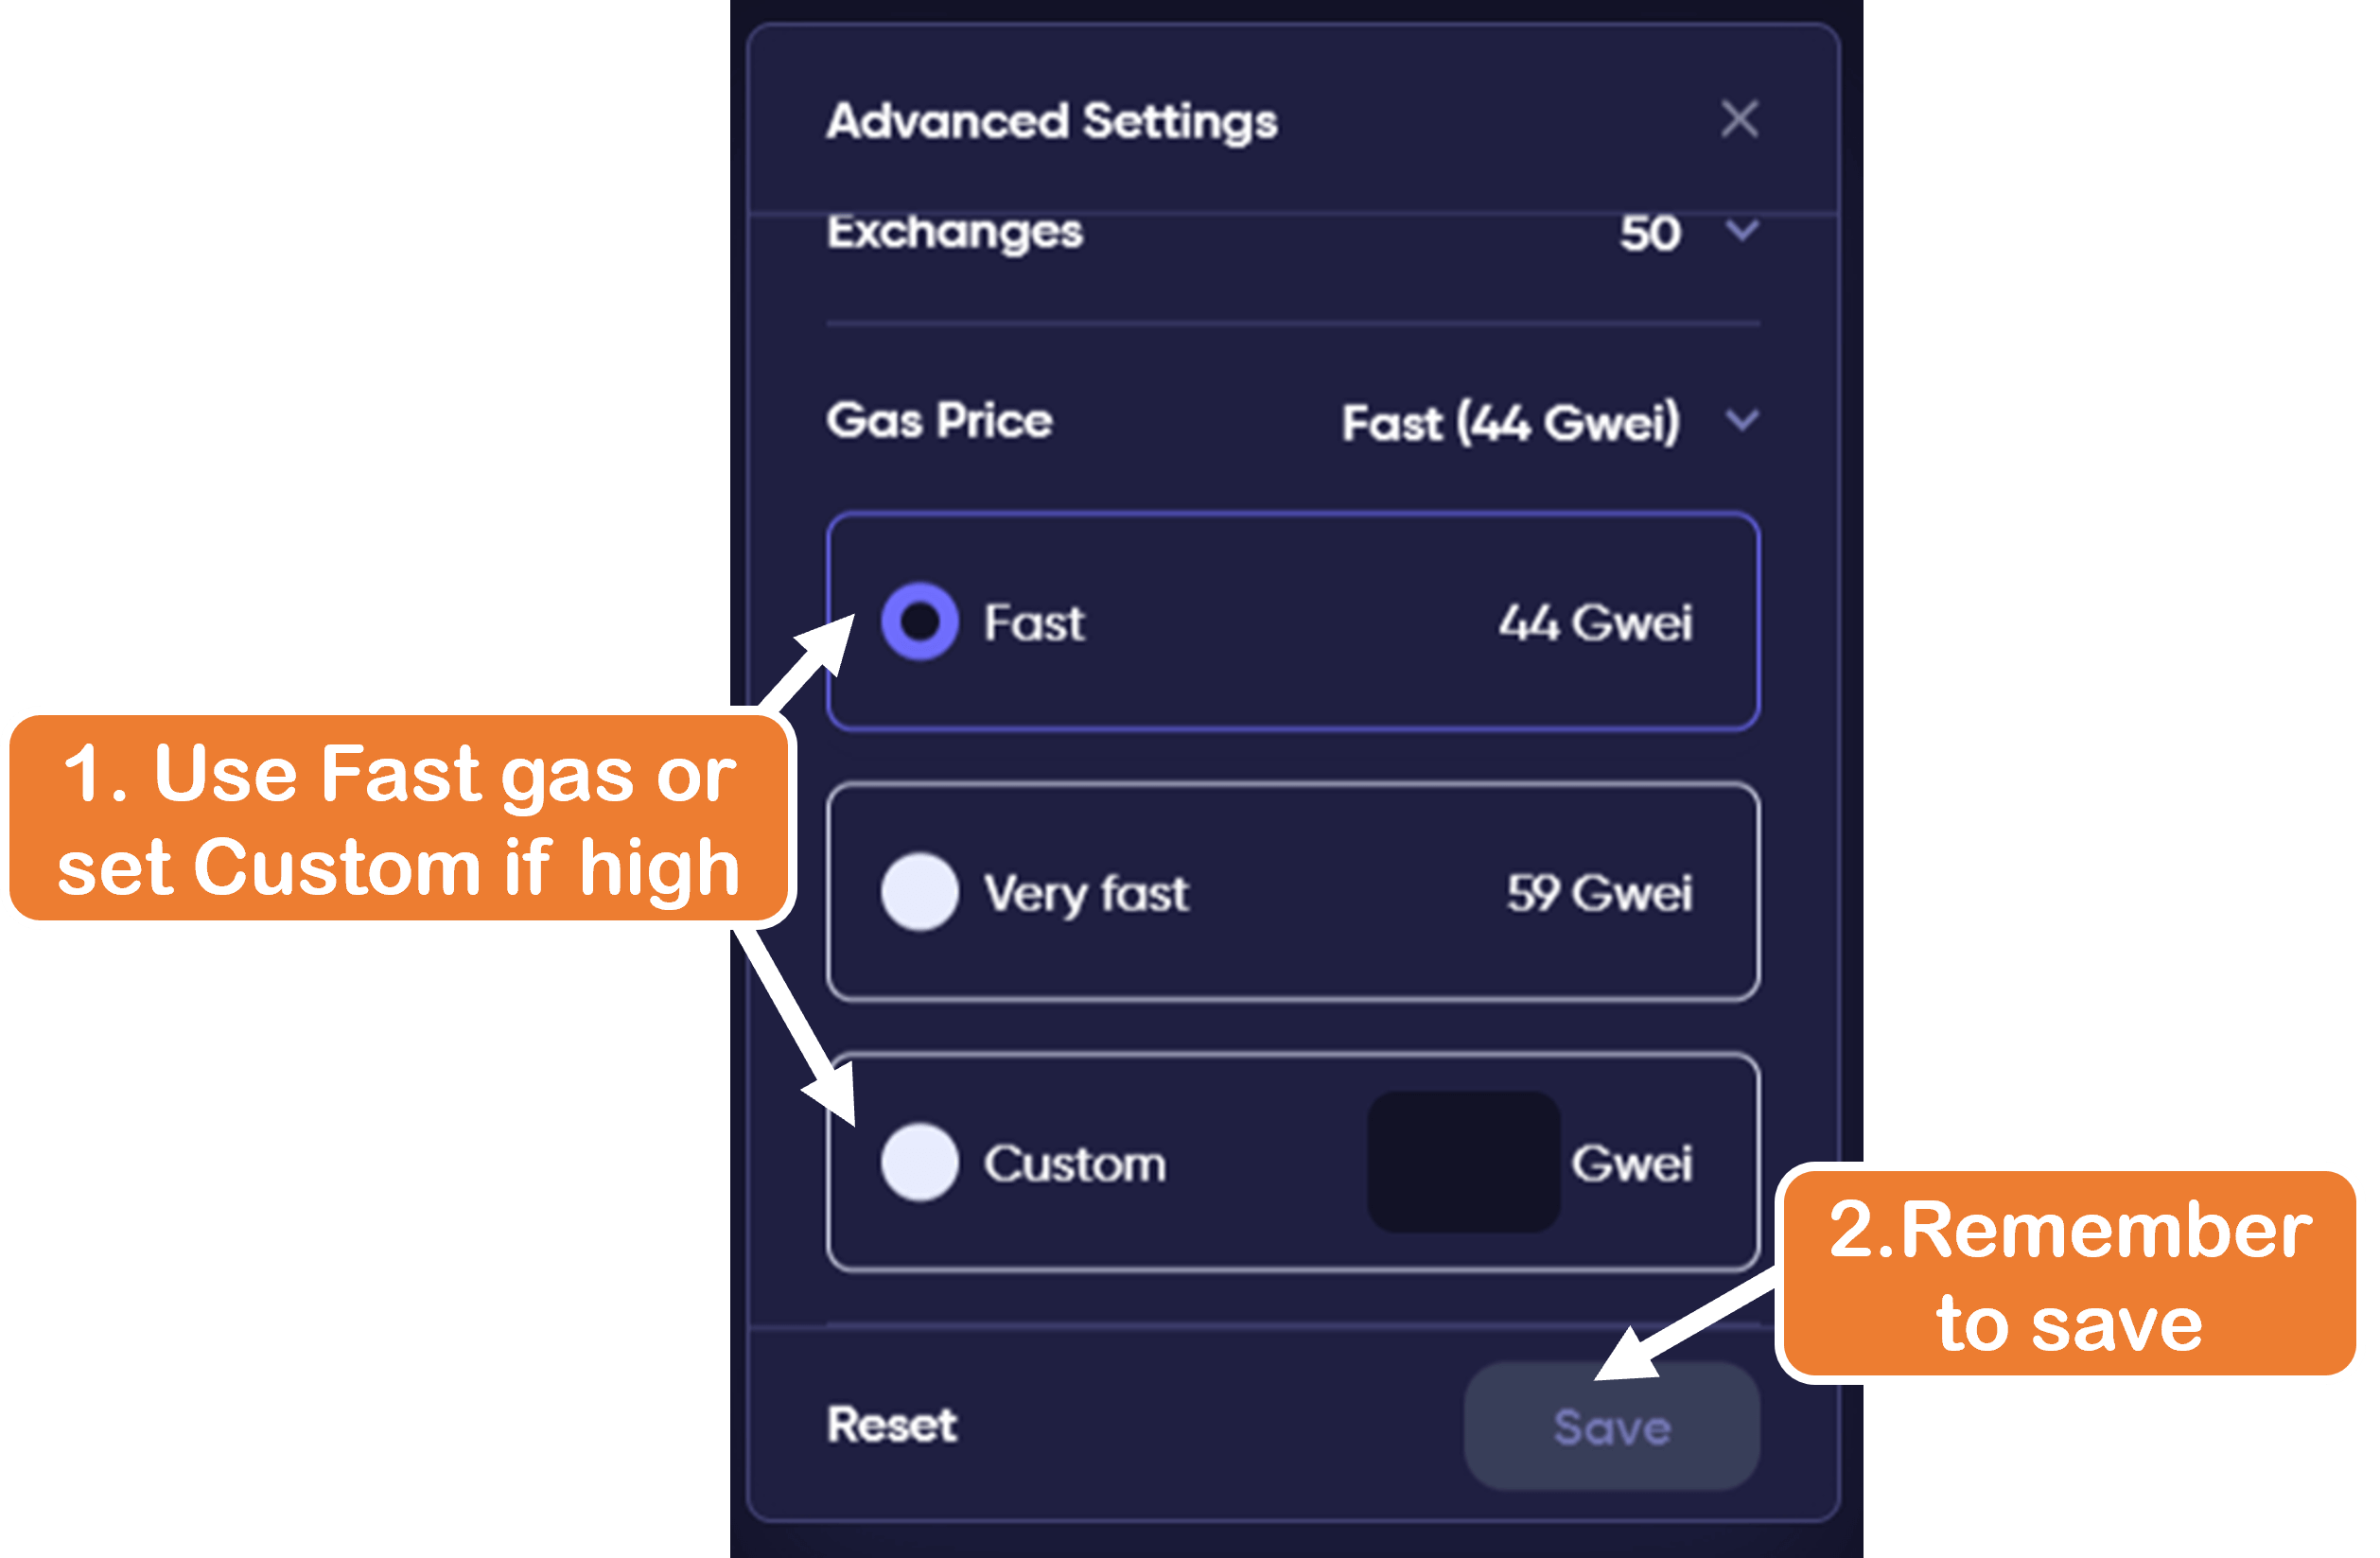
- Matcha will often overestimate gas prices, so if you want to try and save some on gas, use a source like to see a reasonable gas limit and use that for “Custom”
- If you don’t want to worry about that, simply select “Fast”
- Click “Save”
- Leave the settings by clicking the “x” at the top right
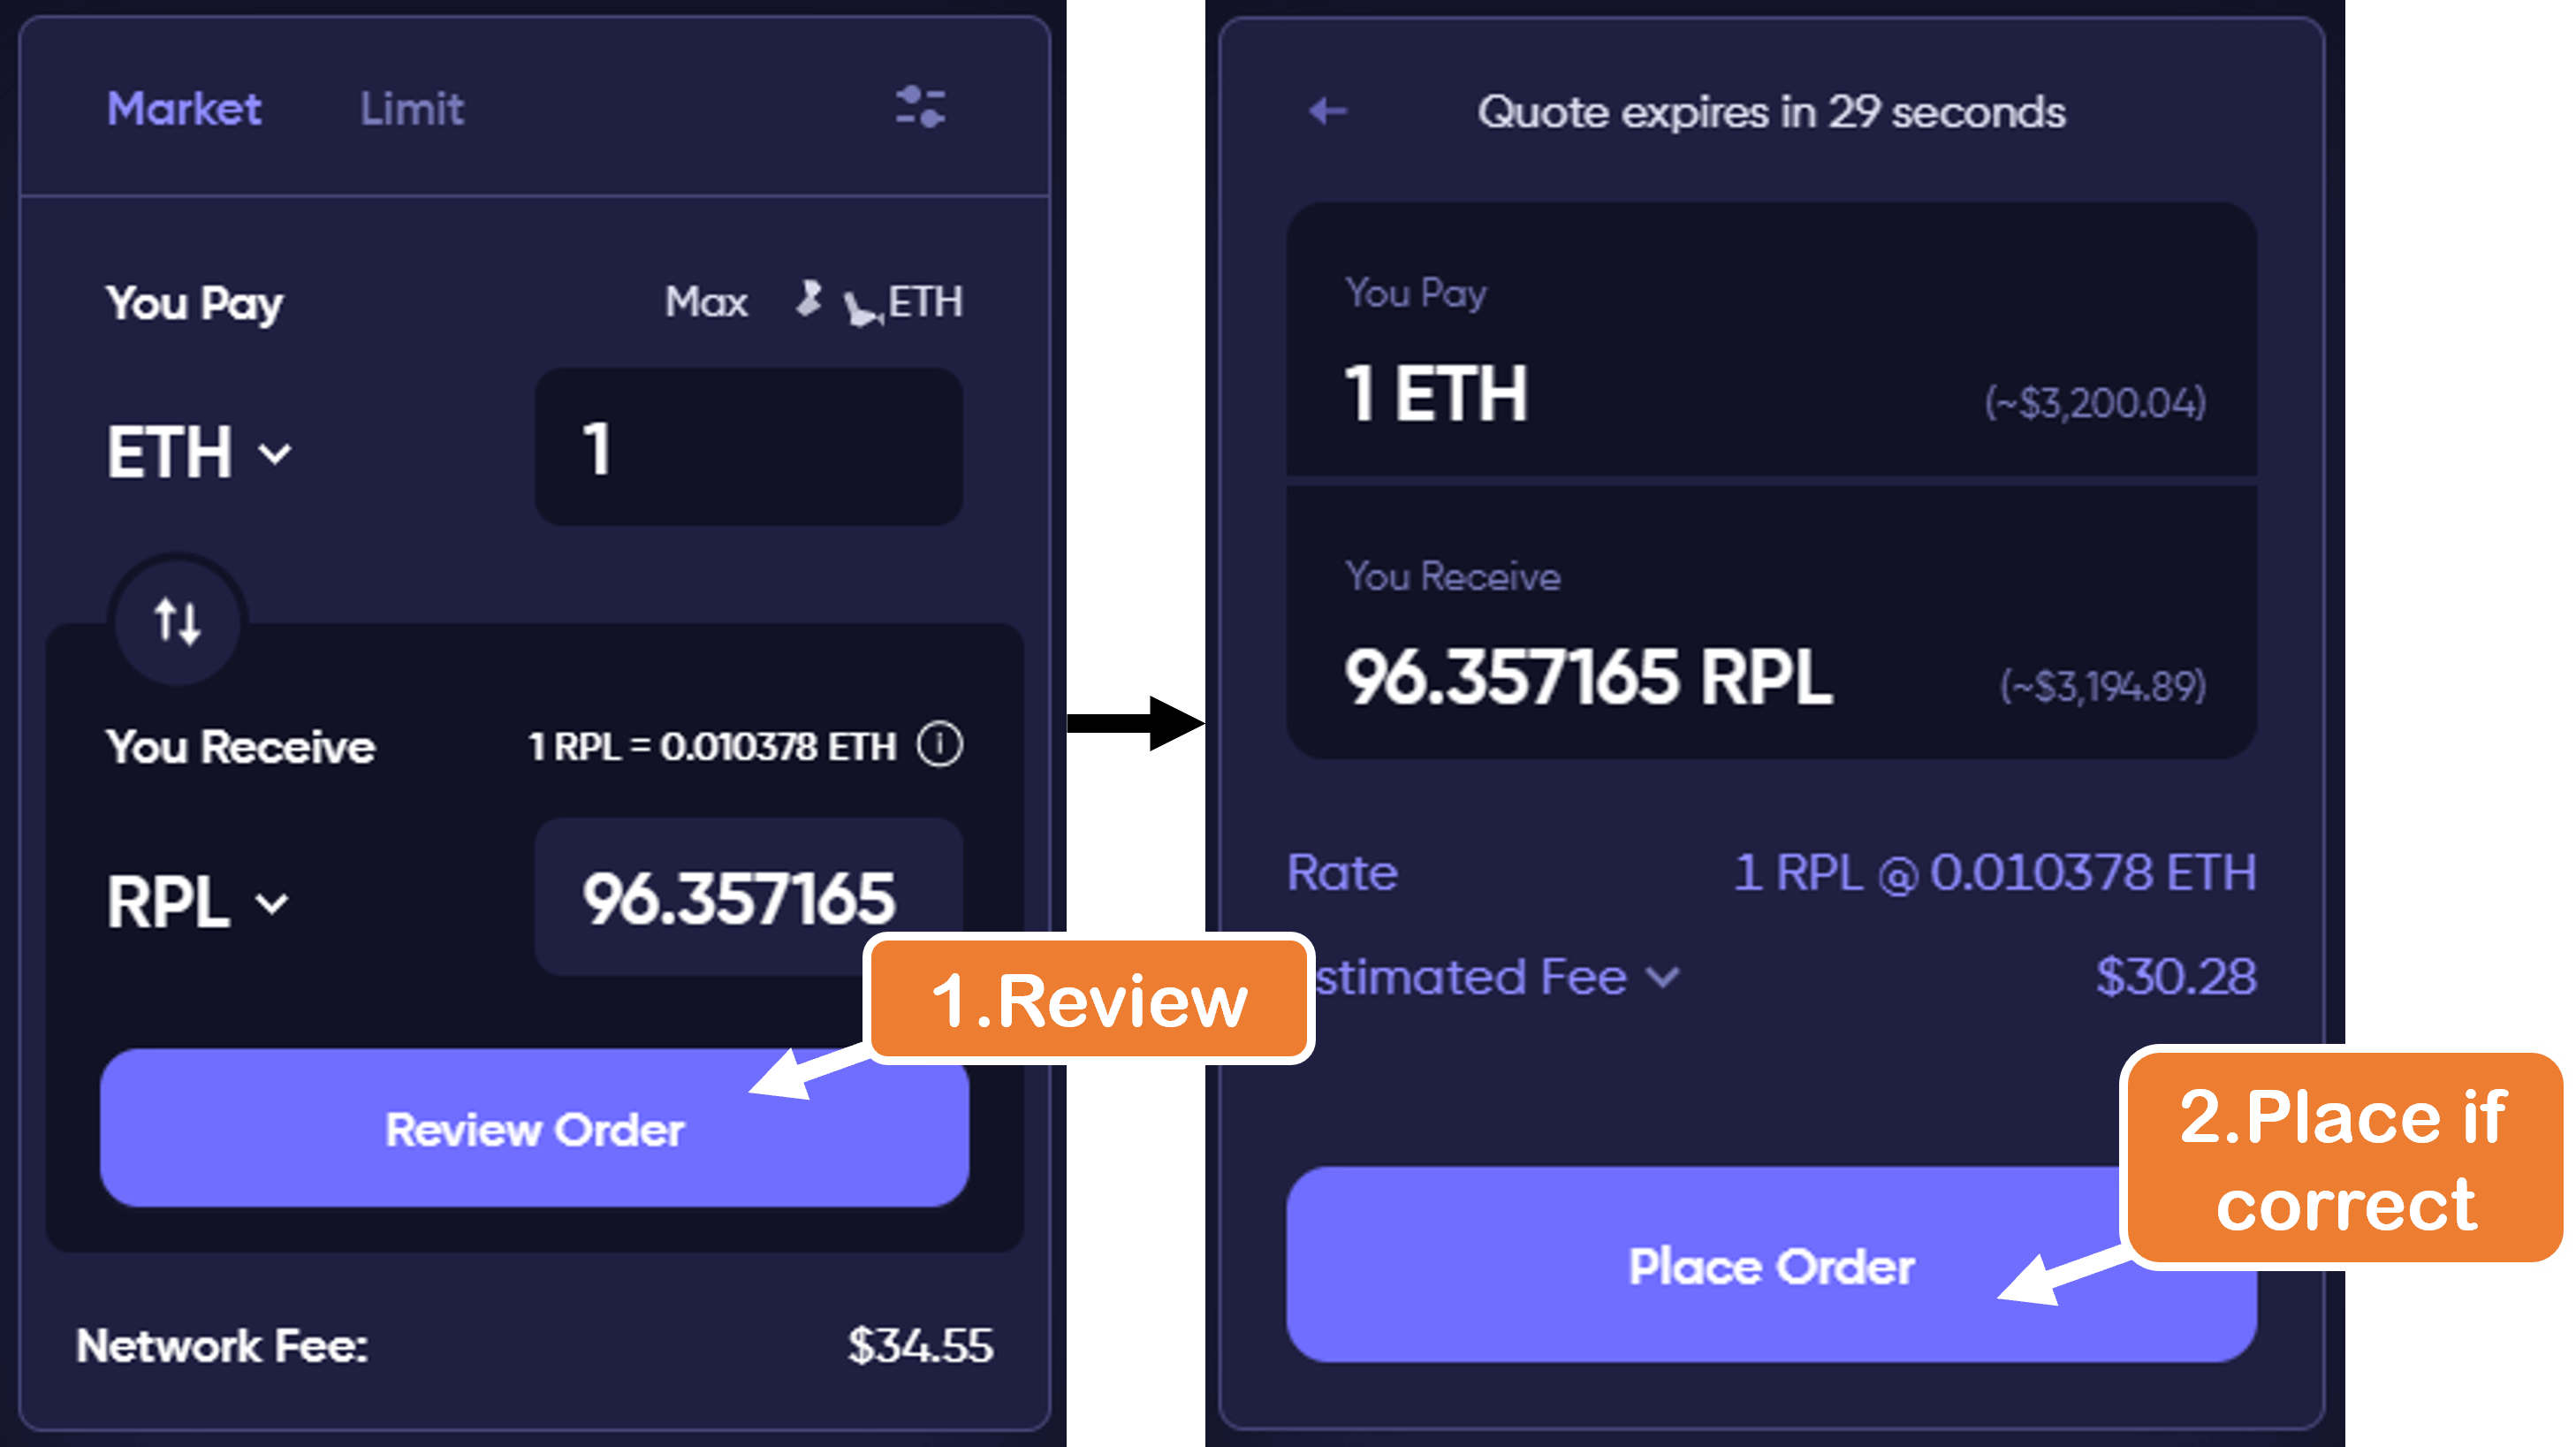
- Click “Review Order” and if satisfied, click “Place Order”
- Note: If you are selling RPL or using a different ERC-20 token to swap to, you will need to approve Matcha to transfer it; instead of “Place Order” you will see “Approve Token”
- Note: If you are selling RPL or using a different ERC-20 token to swap to, you will need to approve Matcha to transfer it; instead of “Place Order” you will see “Approve Token”
- Review the transaction request from your chosen wallet and sign it if all seems good again
Using 1inch
Note: 1inch is currently restricting access to US users.
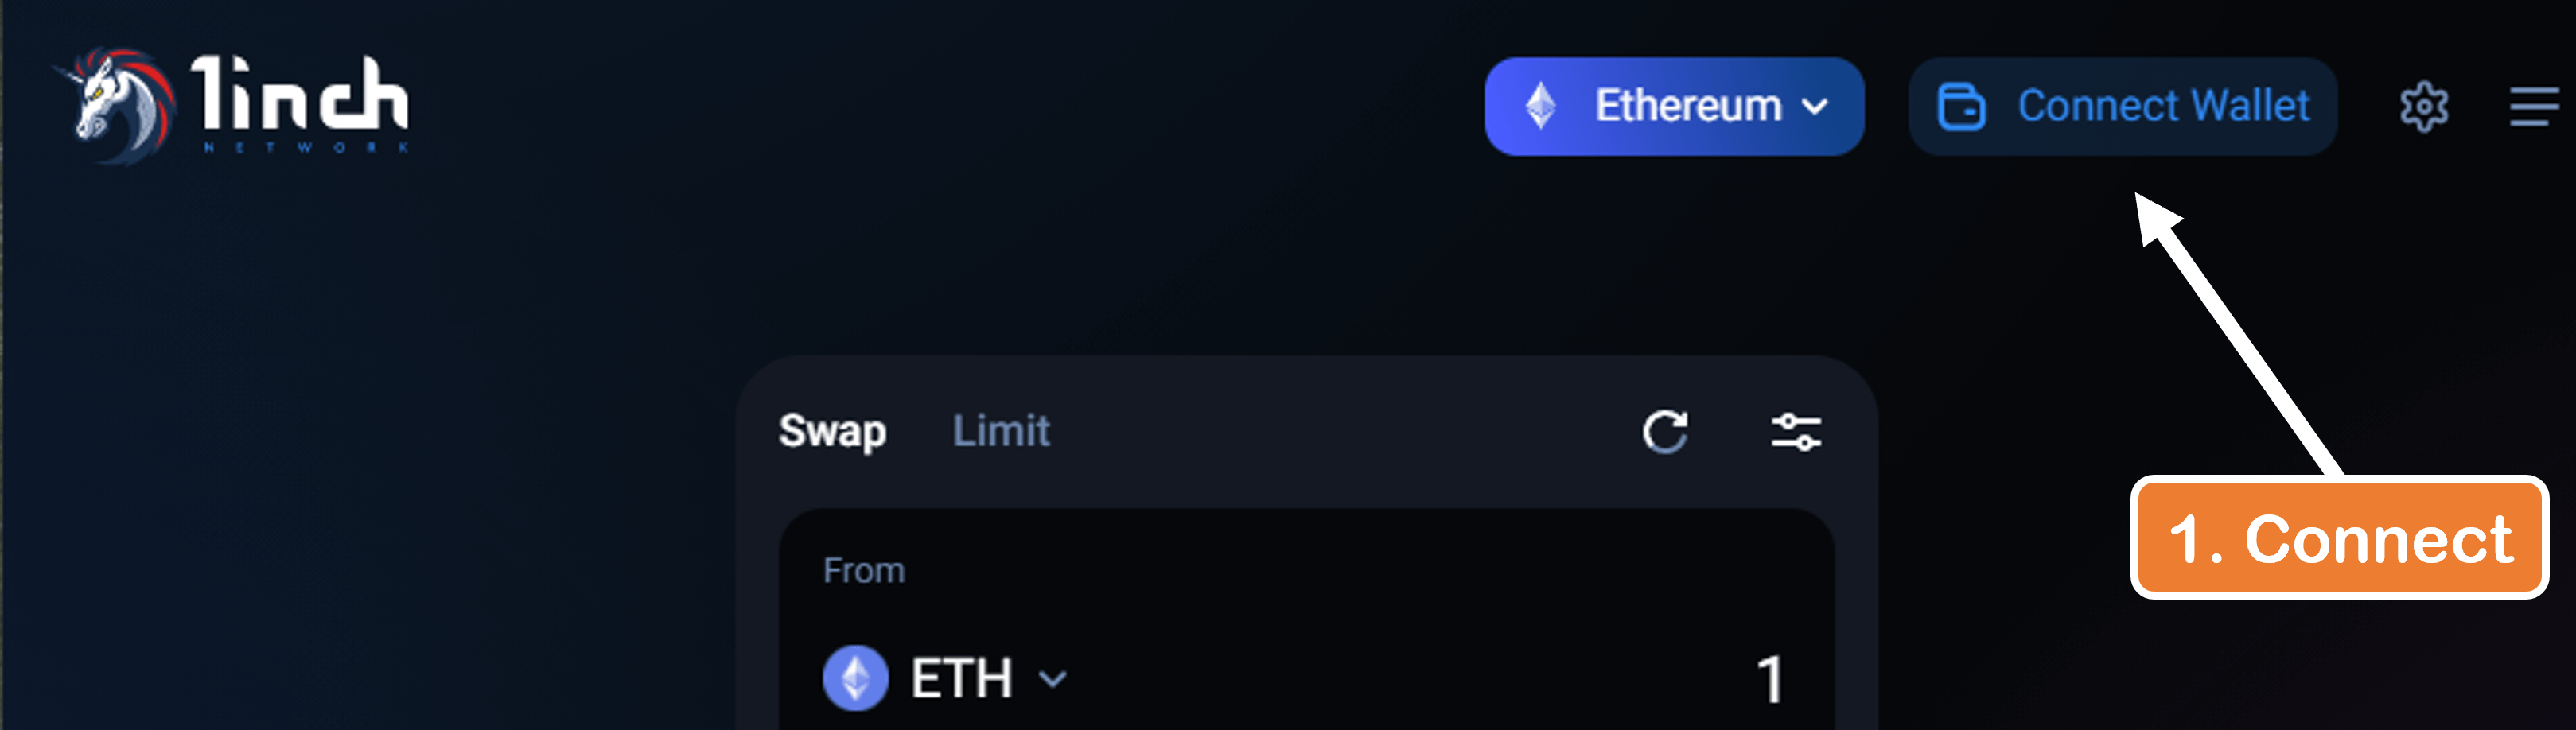
- Go to the 1inch dApp
- Connect your wallet
- Click “Connect Wallet” on the top-right
- Check acceptance of the terms, choose the “Ethereum” network, and connect using the correct option for your wallet
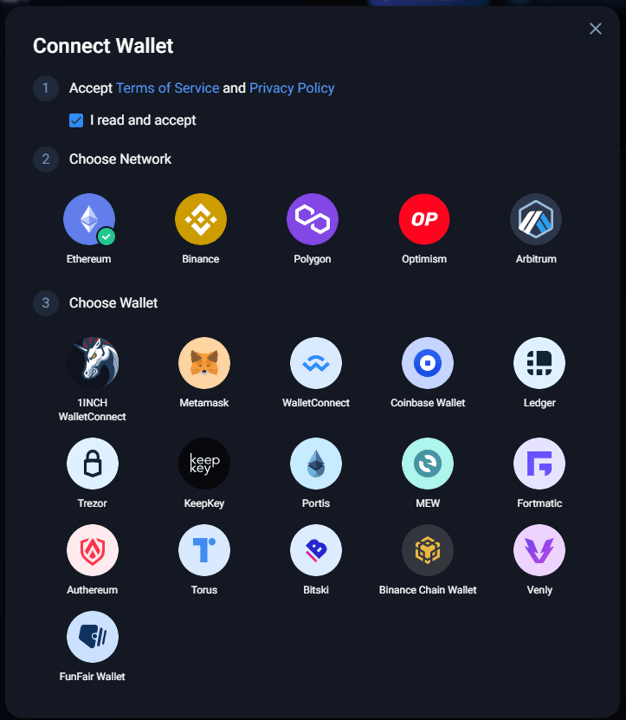
- Click “Connect Wallet” on the top-right
- Go to the RPL token page
- Choose your trading pair and amount
- Select the payment token under “From”
- Fill in the amount desired to trade for RPL
- Note: If you want to sell RPL instead (or RPL is the top token), click the
 icon to toggle the trade direction
 - Note: Putting a specific receipt amount of the “To (estimated)” token costs more gas for the transaction, so it’s beneficial to always set the “From” amount instead)
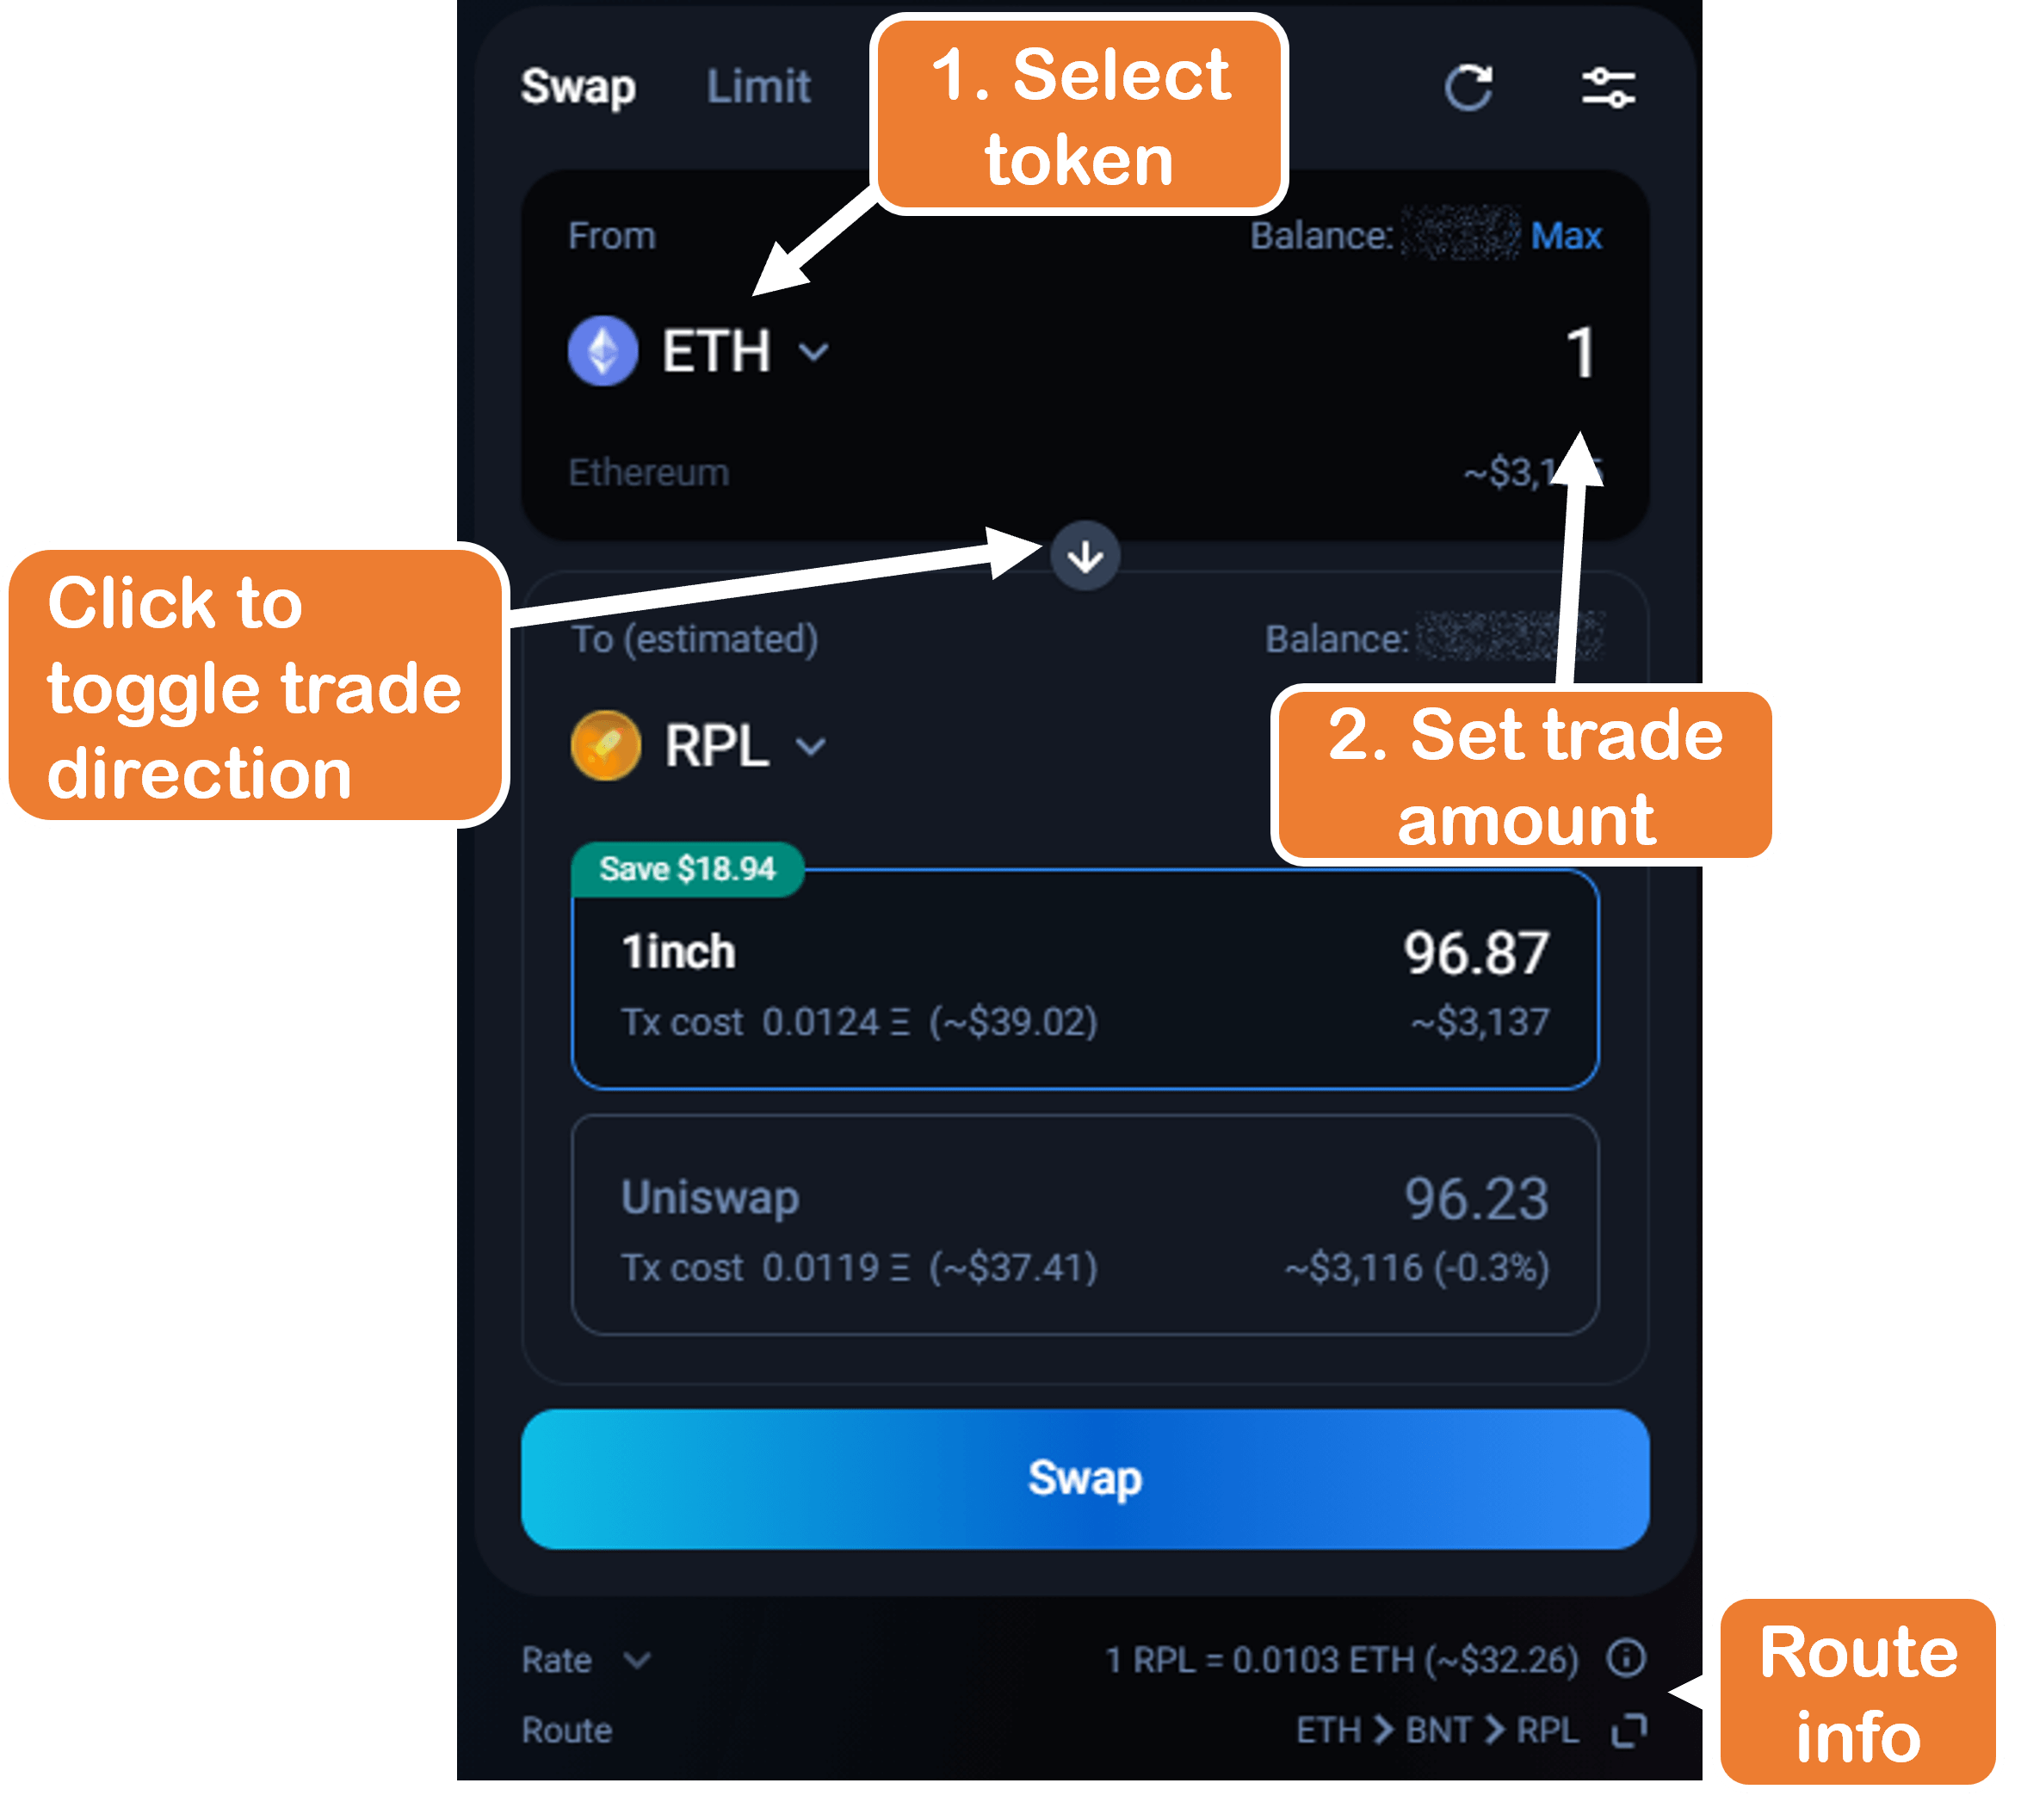
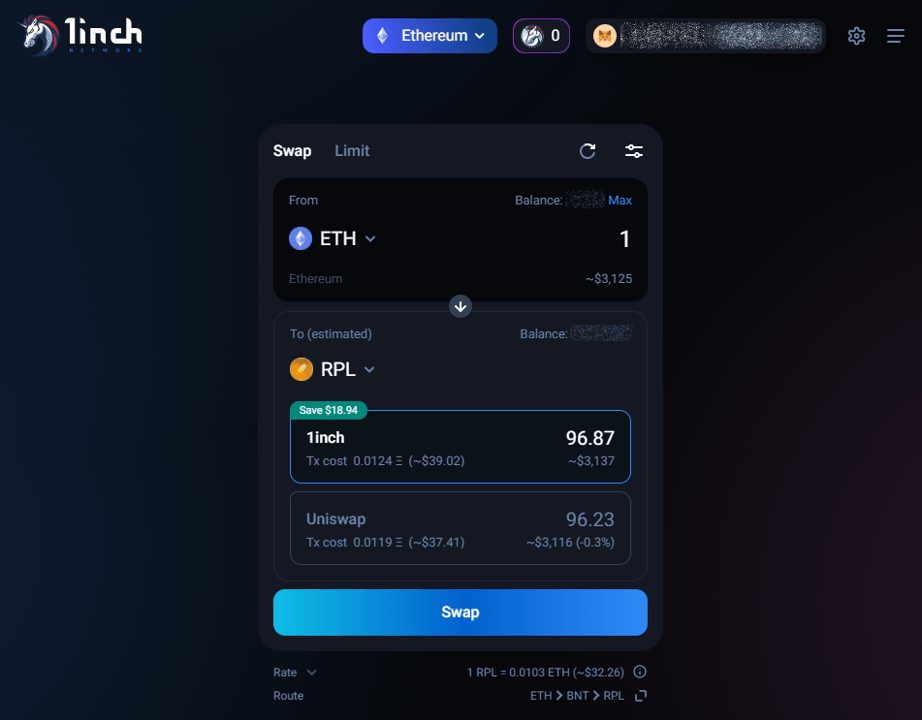
- 1inch will generate a quote from its list of liquidity sources
- See the bottom of the trade panel for routing info
- WAIT! Before finalizing the order, we want to adjust some of settings to save costs
- Click the slider icon on the top right of the trade window

- This is the setting page, we will want to review “Max Slippage” and “Gas Price”
Information on Slippage
Max Slippage defines how much your purchase price can vary from the quoted price; it sets an upper limit on the purchase/sell price.
- When liquidity is low, sandwich bots can more easily raise and lower the RPL price around your transaction, causing you to pay at a higher price than quoted
- Setting a low slippage would mean your transaction would fail if they moved price too much and thus their attack would fail, so they won’t even try it
- If liquidity is high or RPL is not frequently traded, it is not likely that the price will change much during the time of your transaction from natural demand so setting a low slippage is unlikely to cause a trade to fail while still protecting against sandwich attacks
- A good source for liquidity and frequency for the RPL/ETH pair is Uniswap V3 info page
- Generally, >1k RPL/tick or >50 ETH/tick is good liquidity and a trade every 10 minutes or longer is low frequency
- The other settings can be left as default
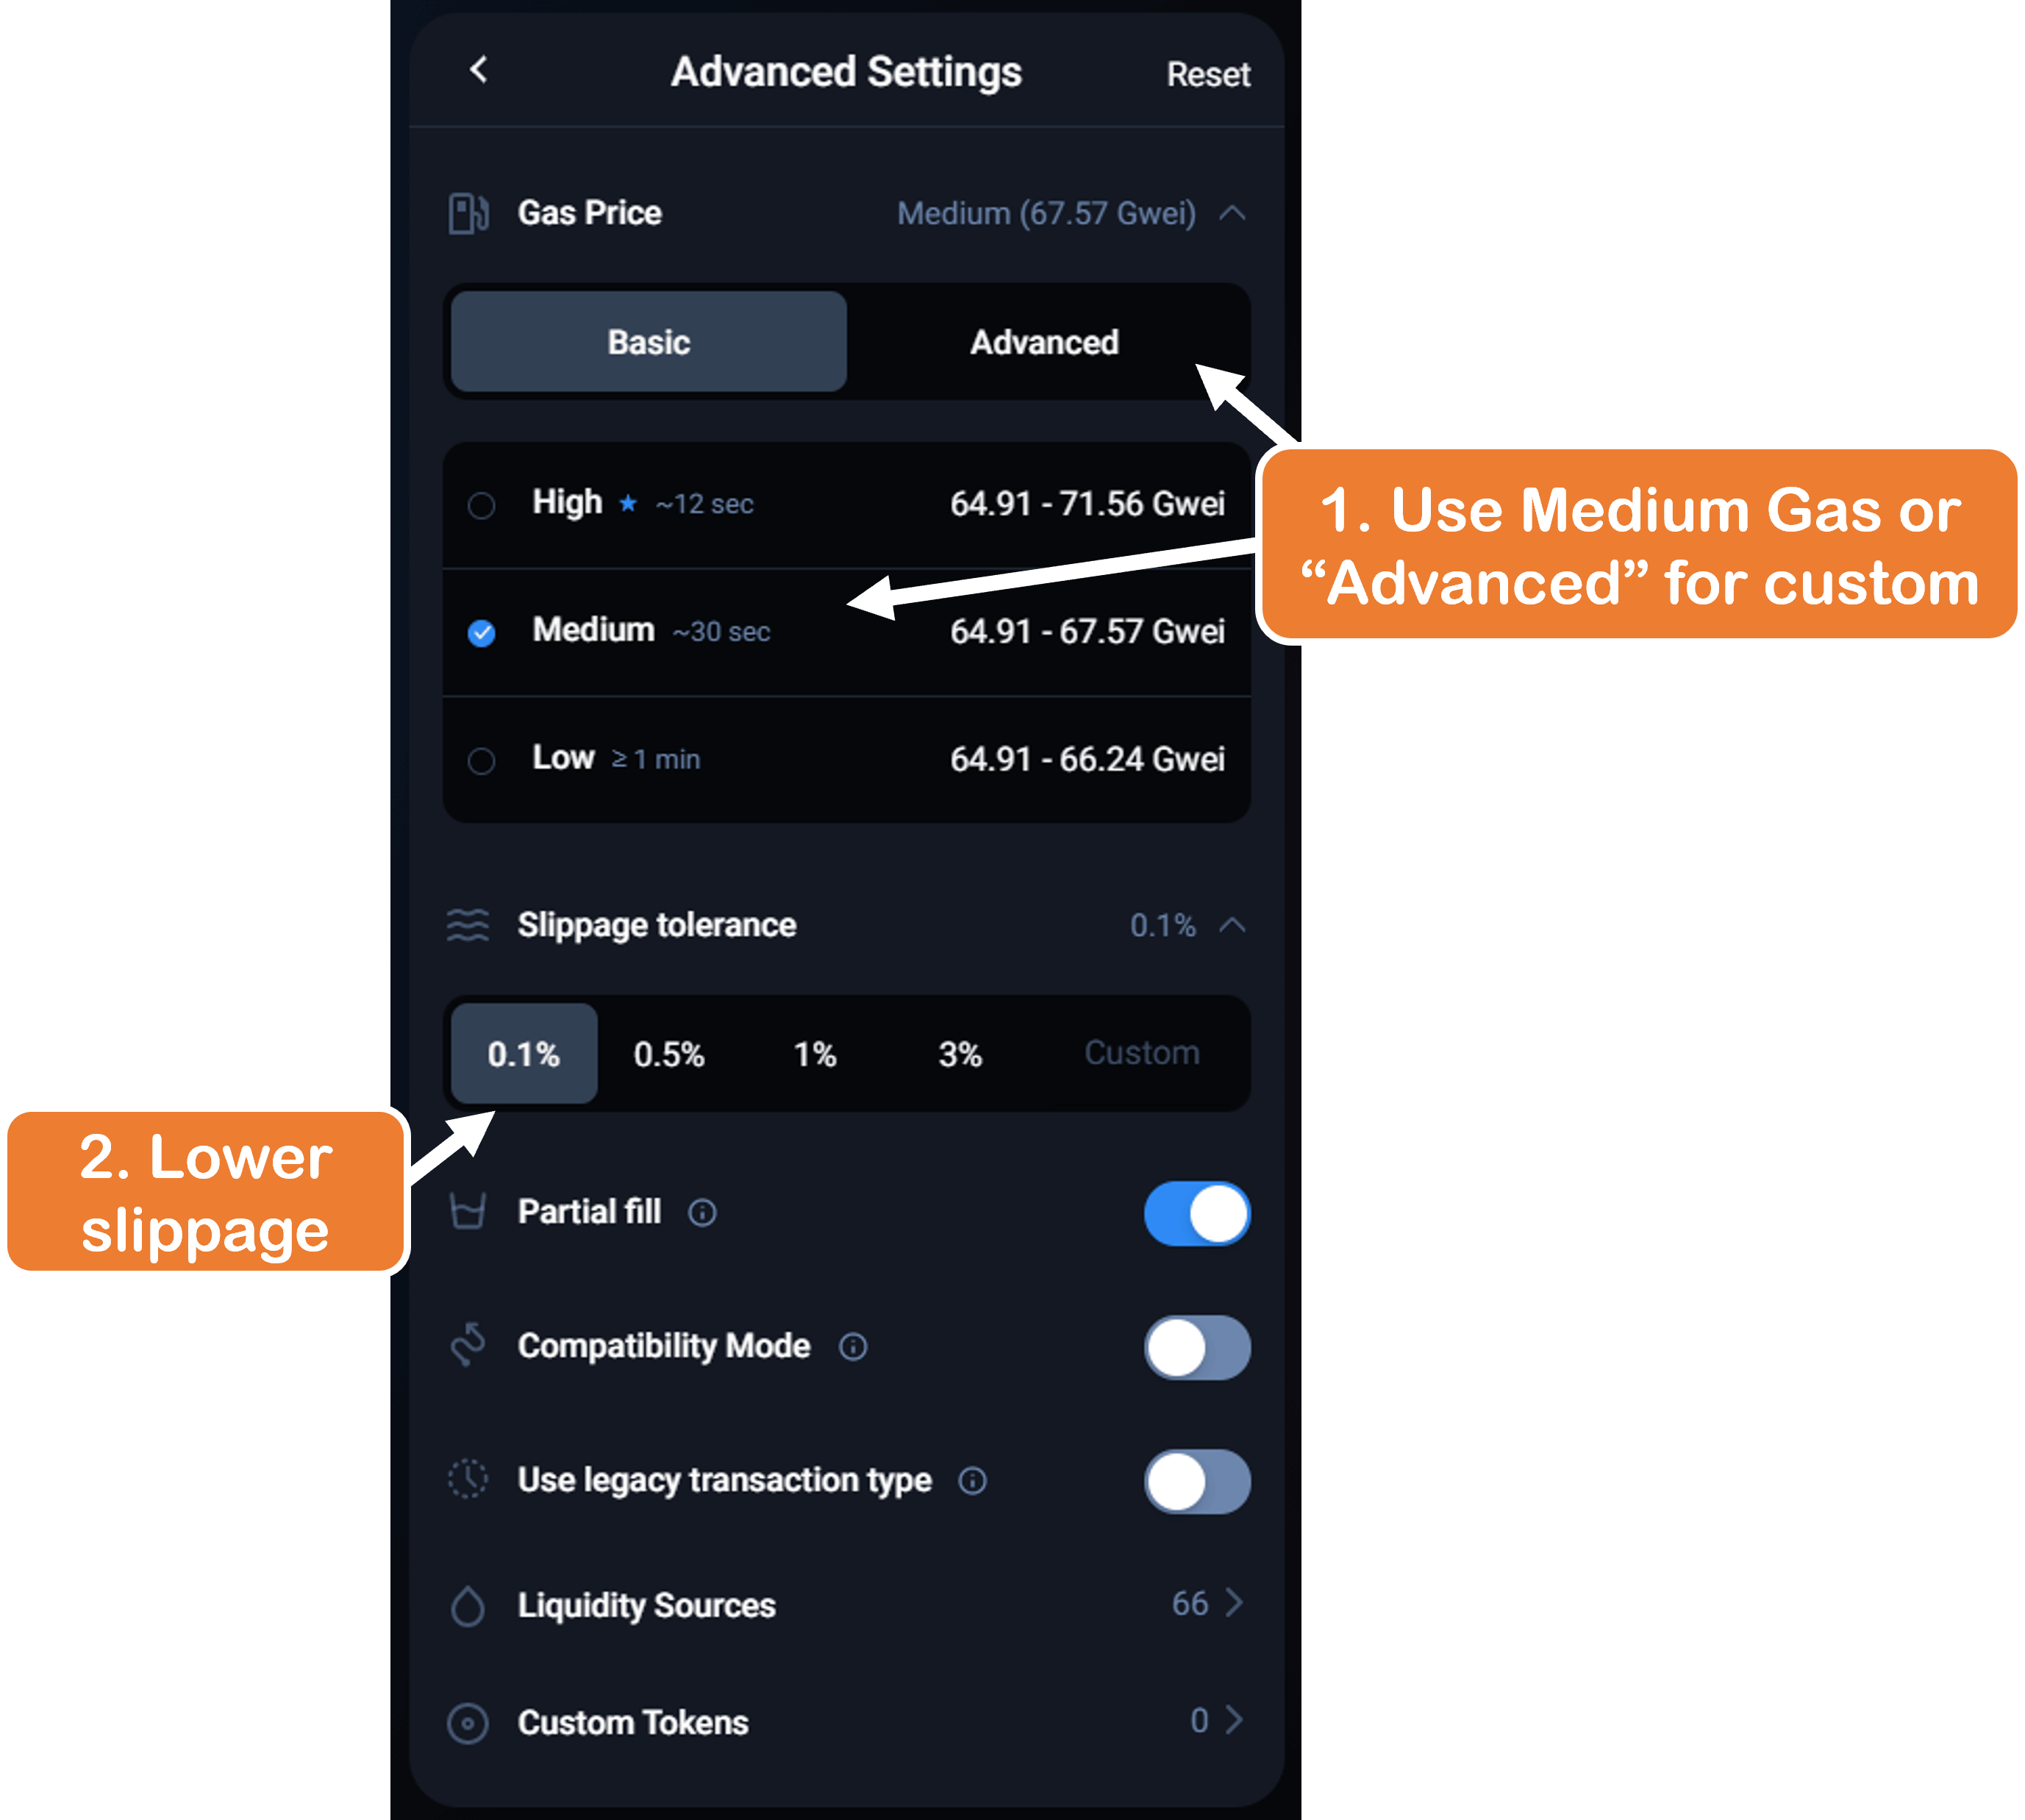
- Click the slider icon on the top right of the trade window
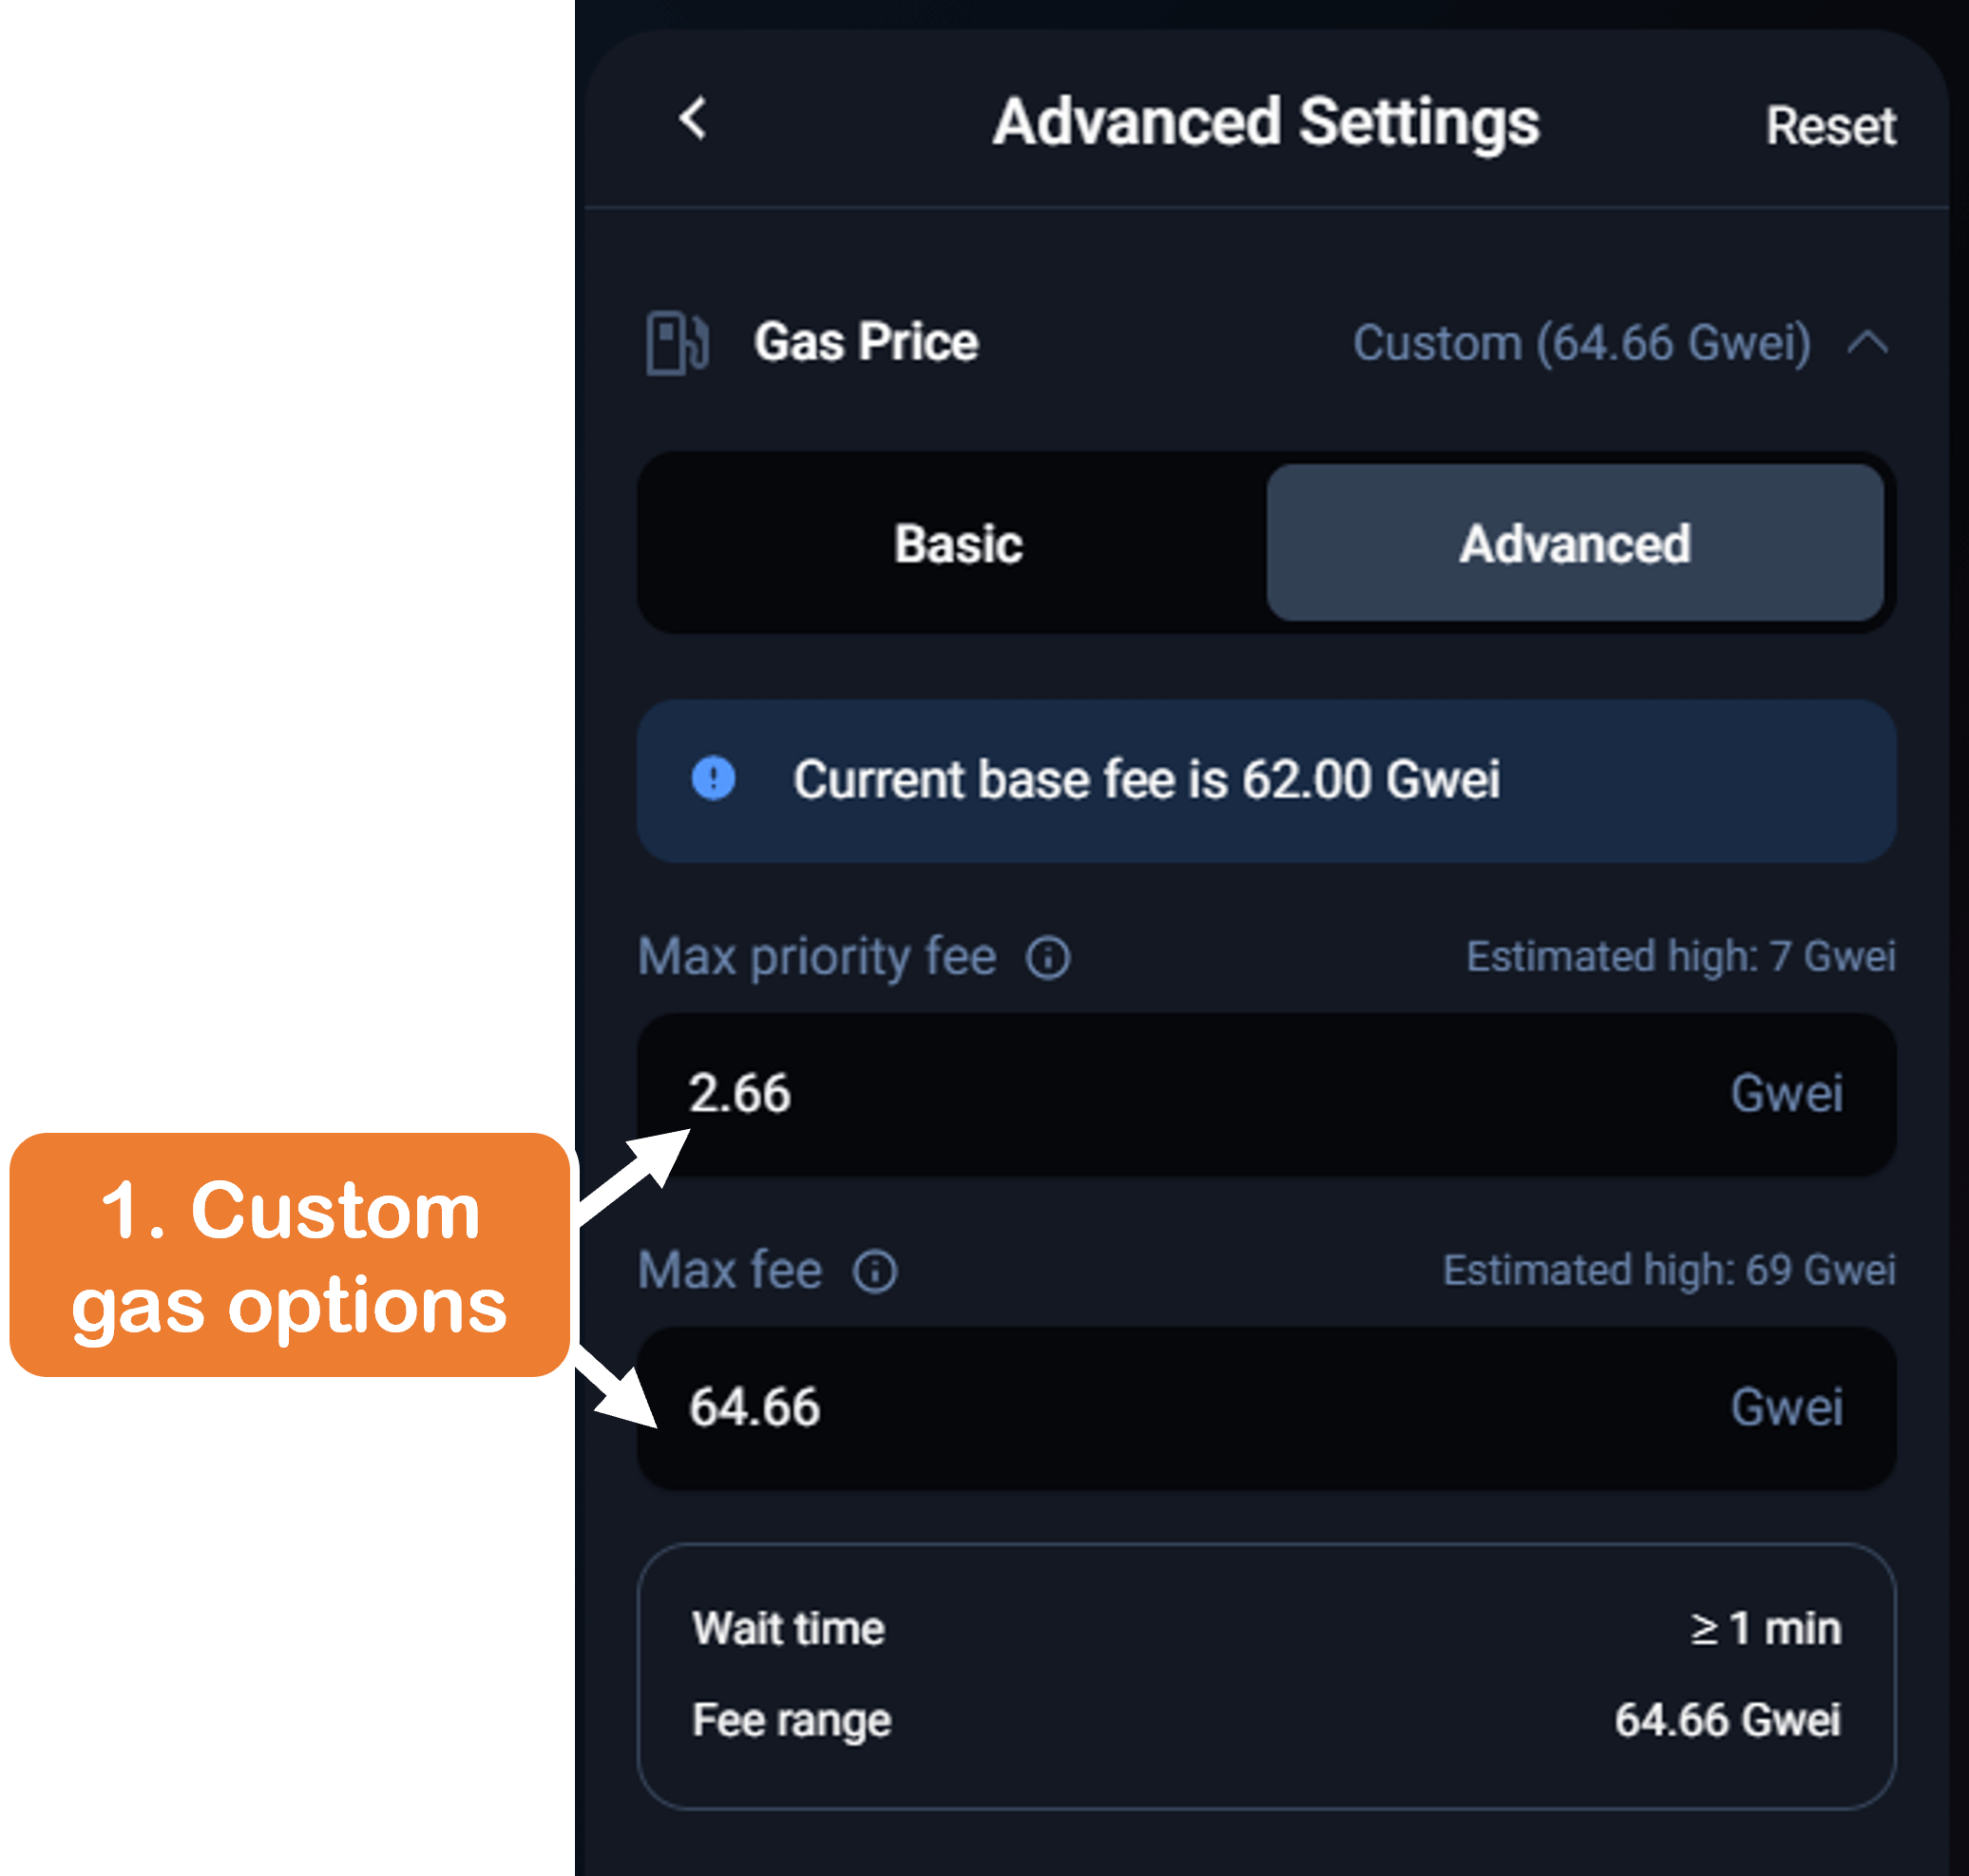
- 1inch can overestimate gas prices, so if you want to try and save some on gas, use a source like to see a reasonable gas limit and use that for “Custom”
- If you don’t want to worry about that, simply select Medium
- If setting custom gas in 1559 format, it is generally suggested to use the estimated “Max priority fee” and adjust the “Max fee” value to limit expenditure
- Set slippage to at least 0.5% and down to 0.1% if RPL volume is still low (see the expandable info above for determining this)
- Note: 0.5% slippage is the safest option for your transaction to succeed but at a higher risk of being sandwich attacked, while 0.1% is the safest option for avoiding a sandwich but at a risk of the transaction failing if you are unlucky enough for another high-priced buy/sell to occur before yours.
- Note: 0.5% slippage is the safest option for your transaction to succeed but at a higher risk of being sandwich attacked, while 0.1% is the safest option for avoiding a sandwich but at a risk of the transaction failing if you are unlucky enough for another high-priced buy/sell to occur before yours.
- Leave the settings by clicking the “<” at the top-left
- Click “Swap” and if satisfied, click “Confirm Swap”
- *Note: If you are selling RPL or using a different ERC-20 token to swap to, you will need to approve 1inch to transfer it; instead of “Swap” you will see “Give permission to swap
”*
- *Note: If you are selling RPL or using a different ERC-20 token to swap to, you will need to approve 1inch to transfer it; instead of “Swap” you will see “Give permission to swap
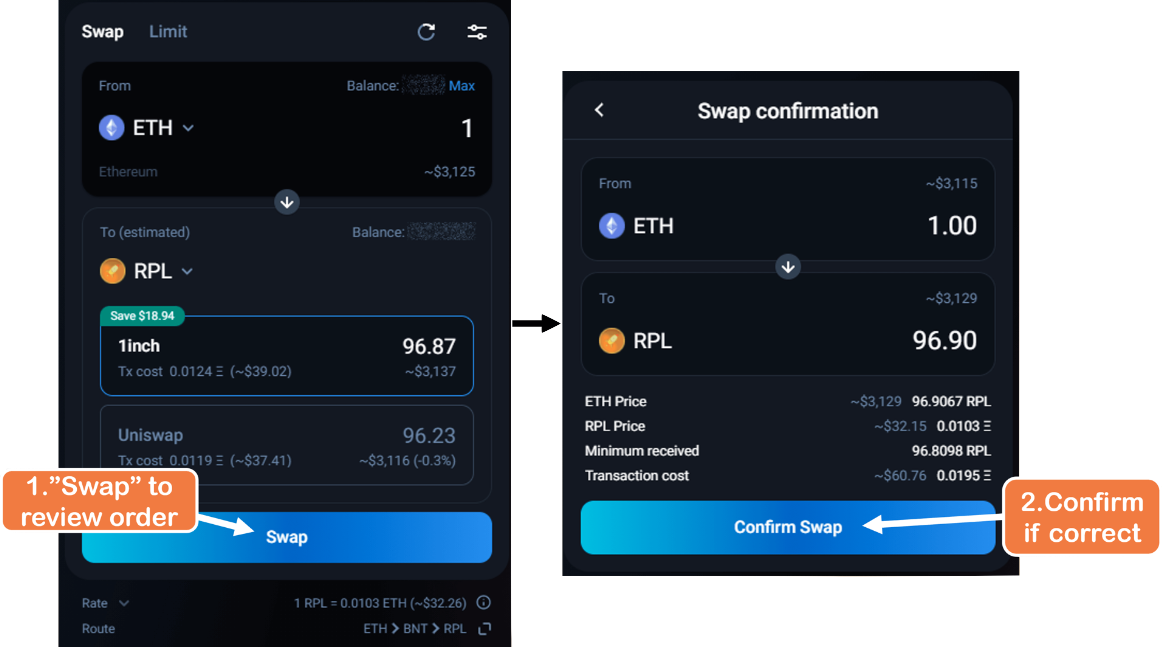
- Review the transaction request from your chosen wallet and sign it if all seems good again
Using Paraswap
- Go to the Paraswap dApp
- Connect your wallet
- Click “Connect Wallet” on the top-right

- Choose the “Ethereum” network, and connect using the correct option for your wallet
- Click “Connect Wallet” on the top-right
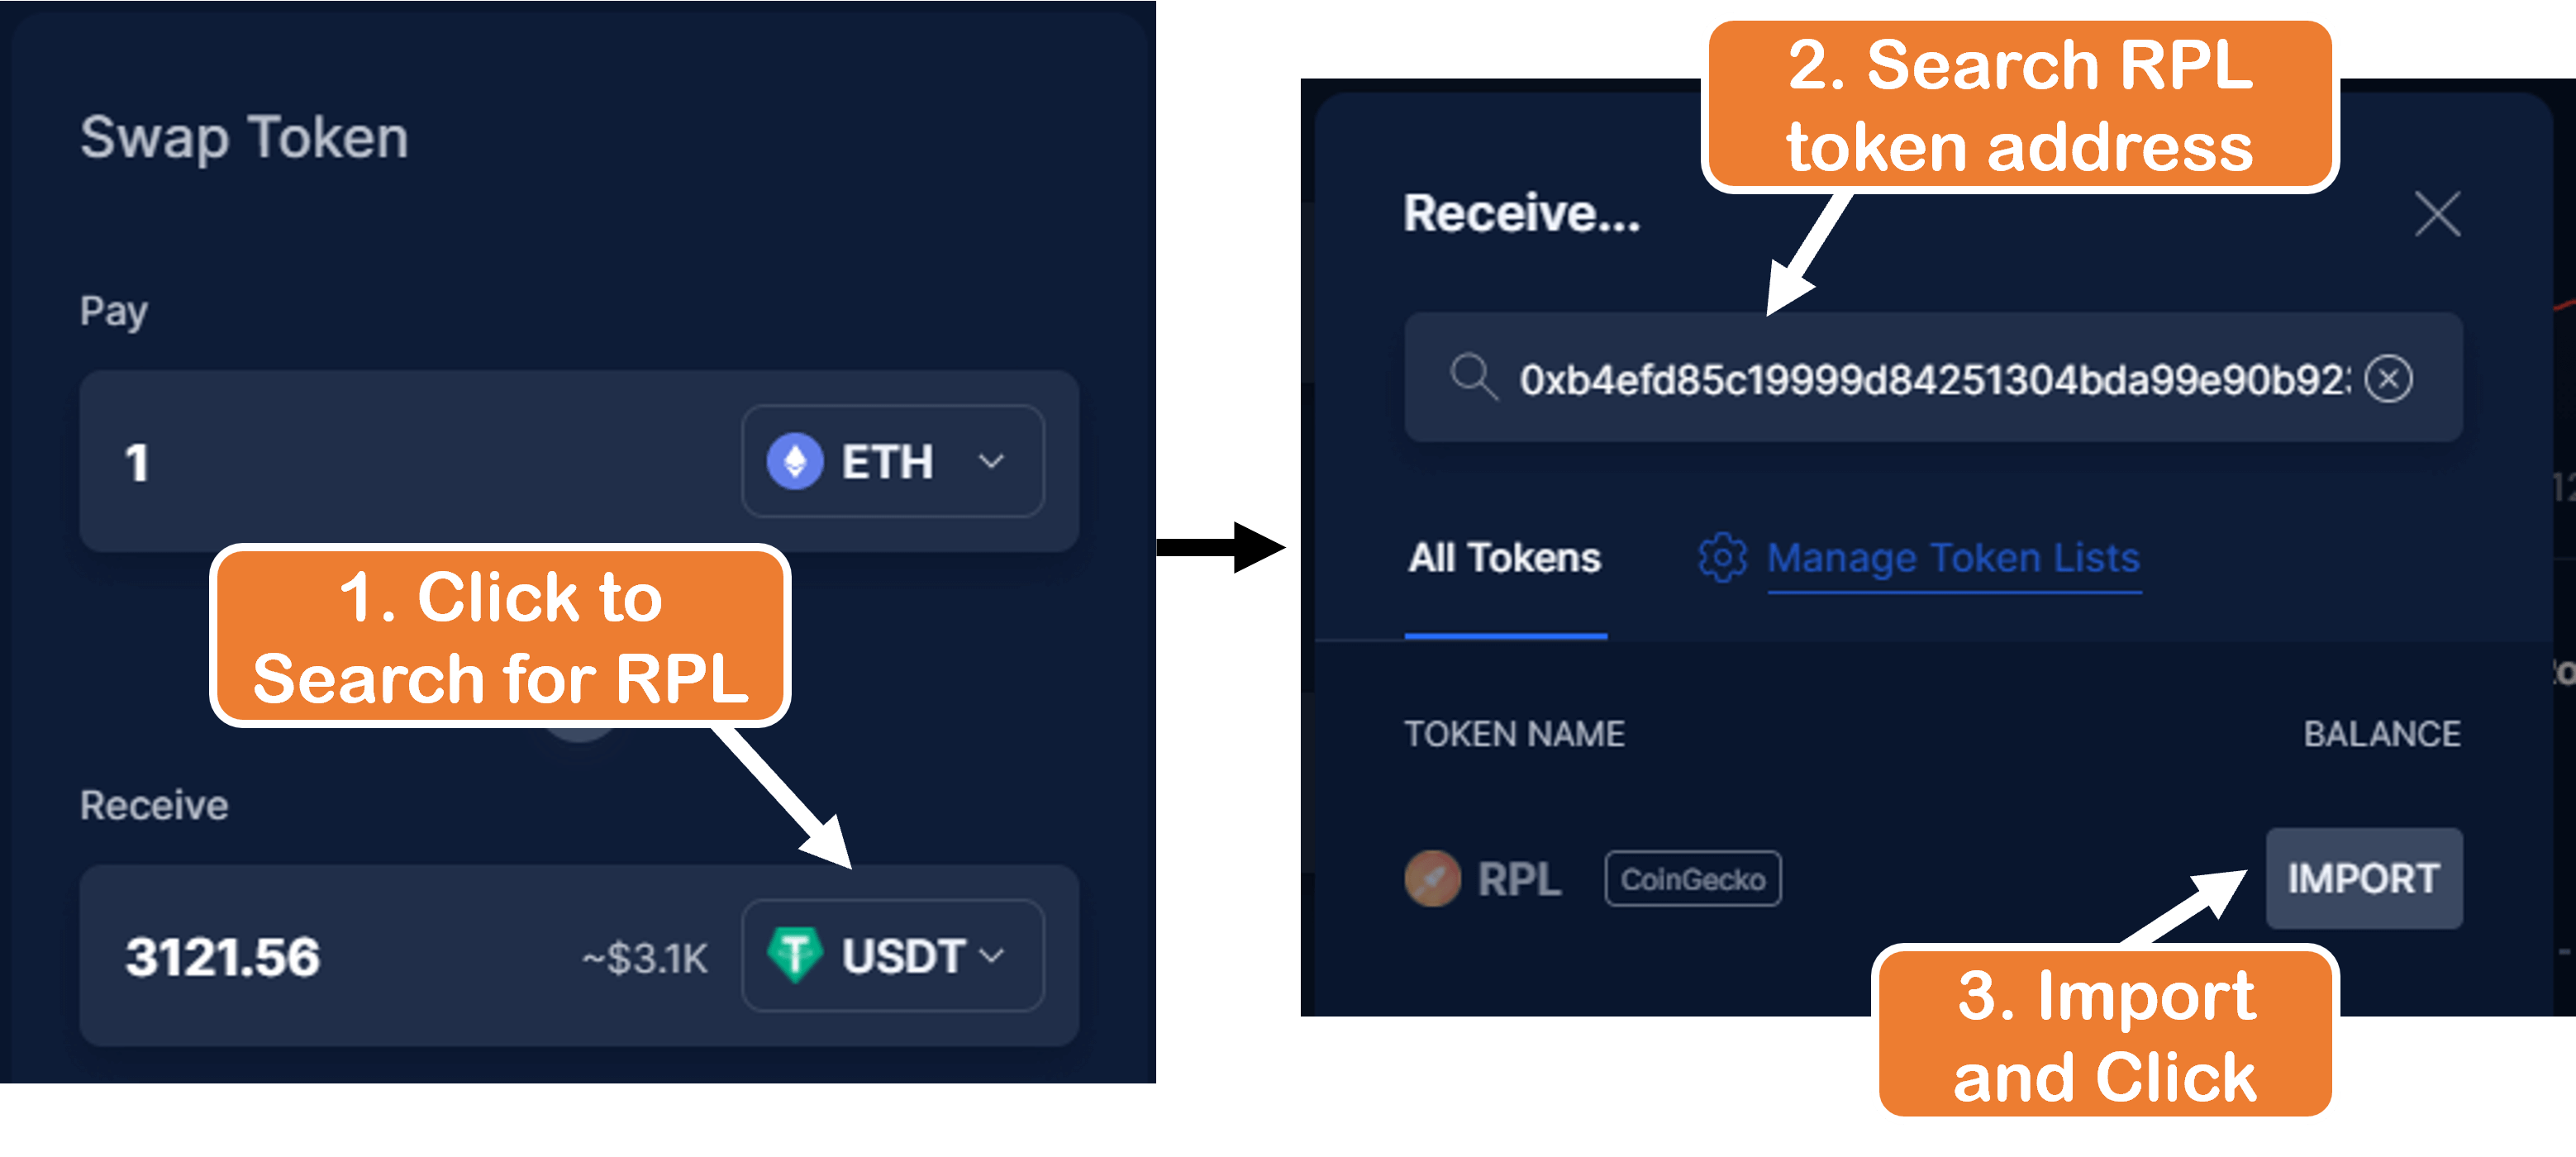
- Search for the RPL token page
- Click on the default token under “Receive” (USDT in the image below)
- Search for the official RPL token address which is currently: 0xb4efd85c19999d84251304bda99e90b92300bd93
- Import and select by clicking on “RPL”
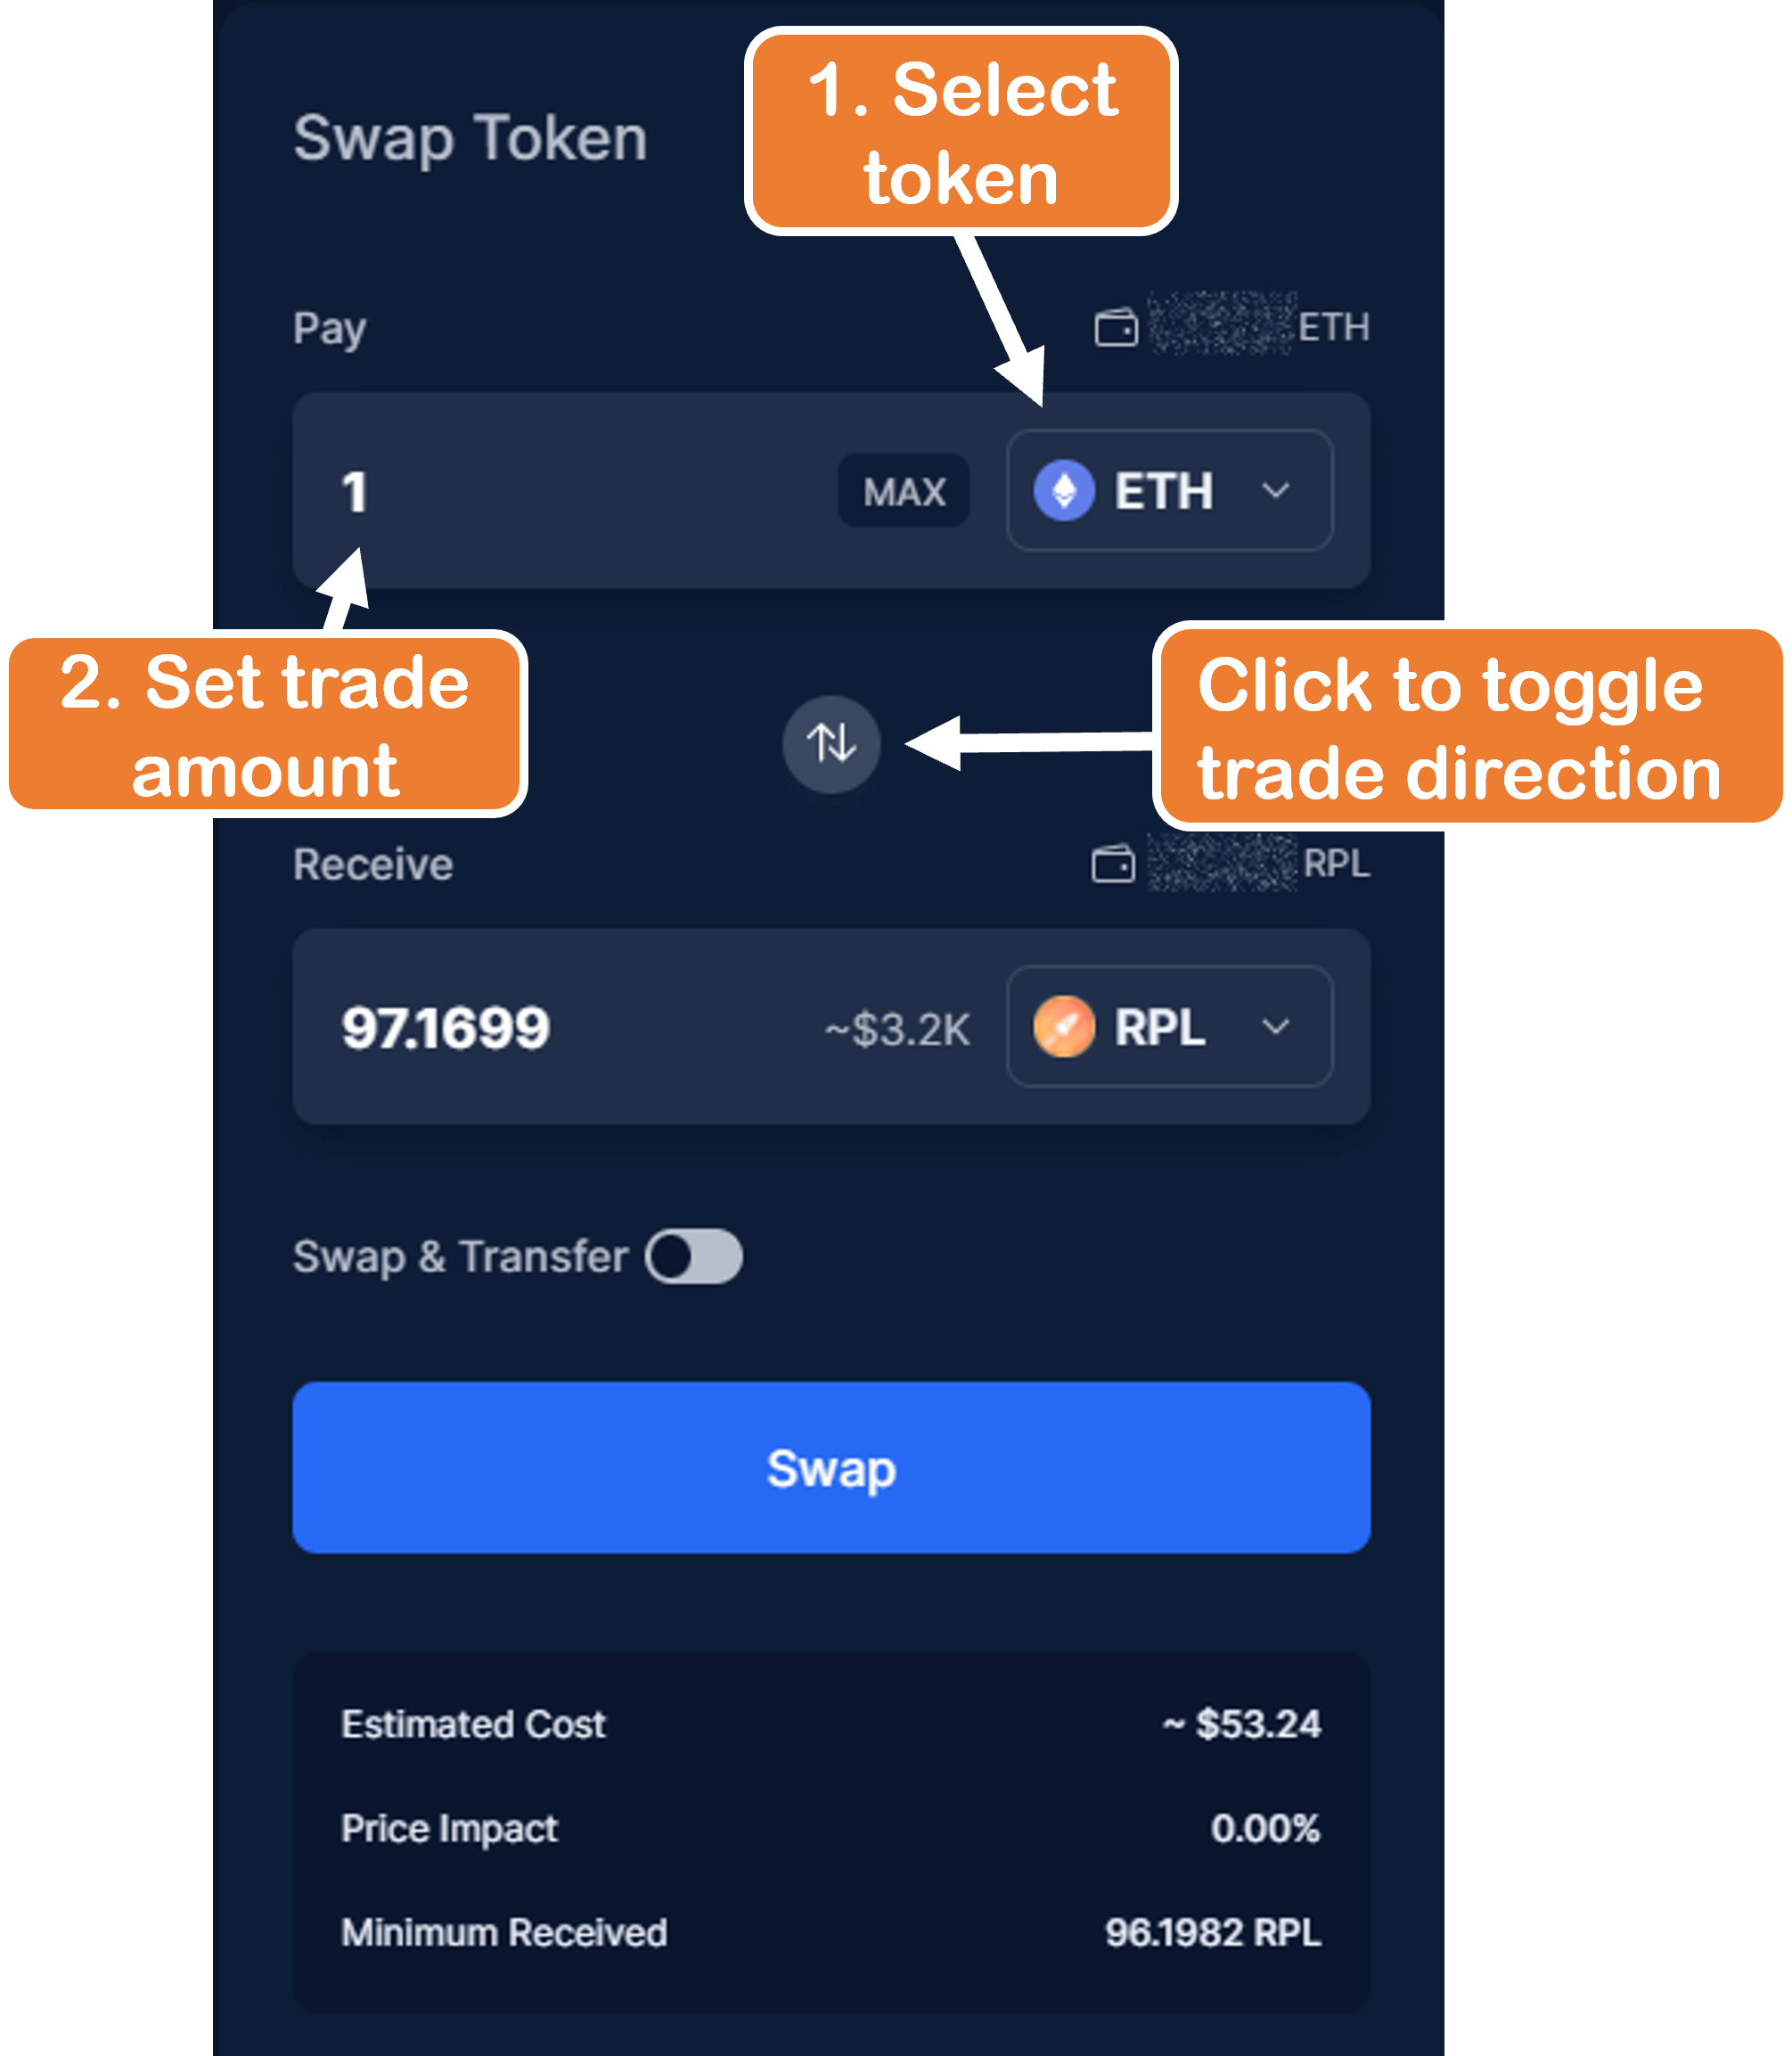
- Choose your trading pair and amount
- Select the payment token under “Pay”
- Fill in the amount desired to trade for RPL
- Note: If you want to sell RPL instead (or RPL is the top token), click the
 icon to toggle the trade direction
 - Note: Putting a specific receipt amount of the “Receive” token costs more gas for the transaction, so it’s beneficial to always set the “Pay” amount instead)
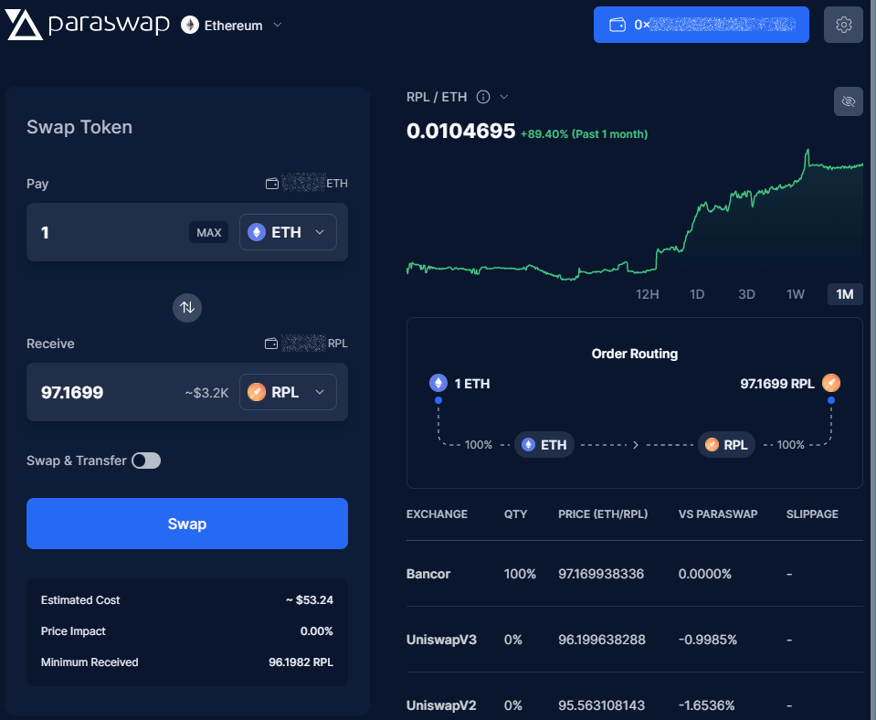
- ParaSwap will generate a quote from its list of liquidity sources
- Check the Order Routing info on the right-side of the page
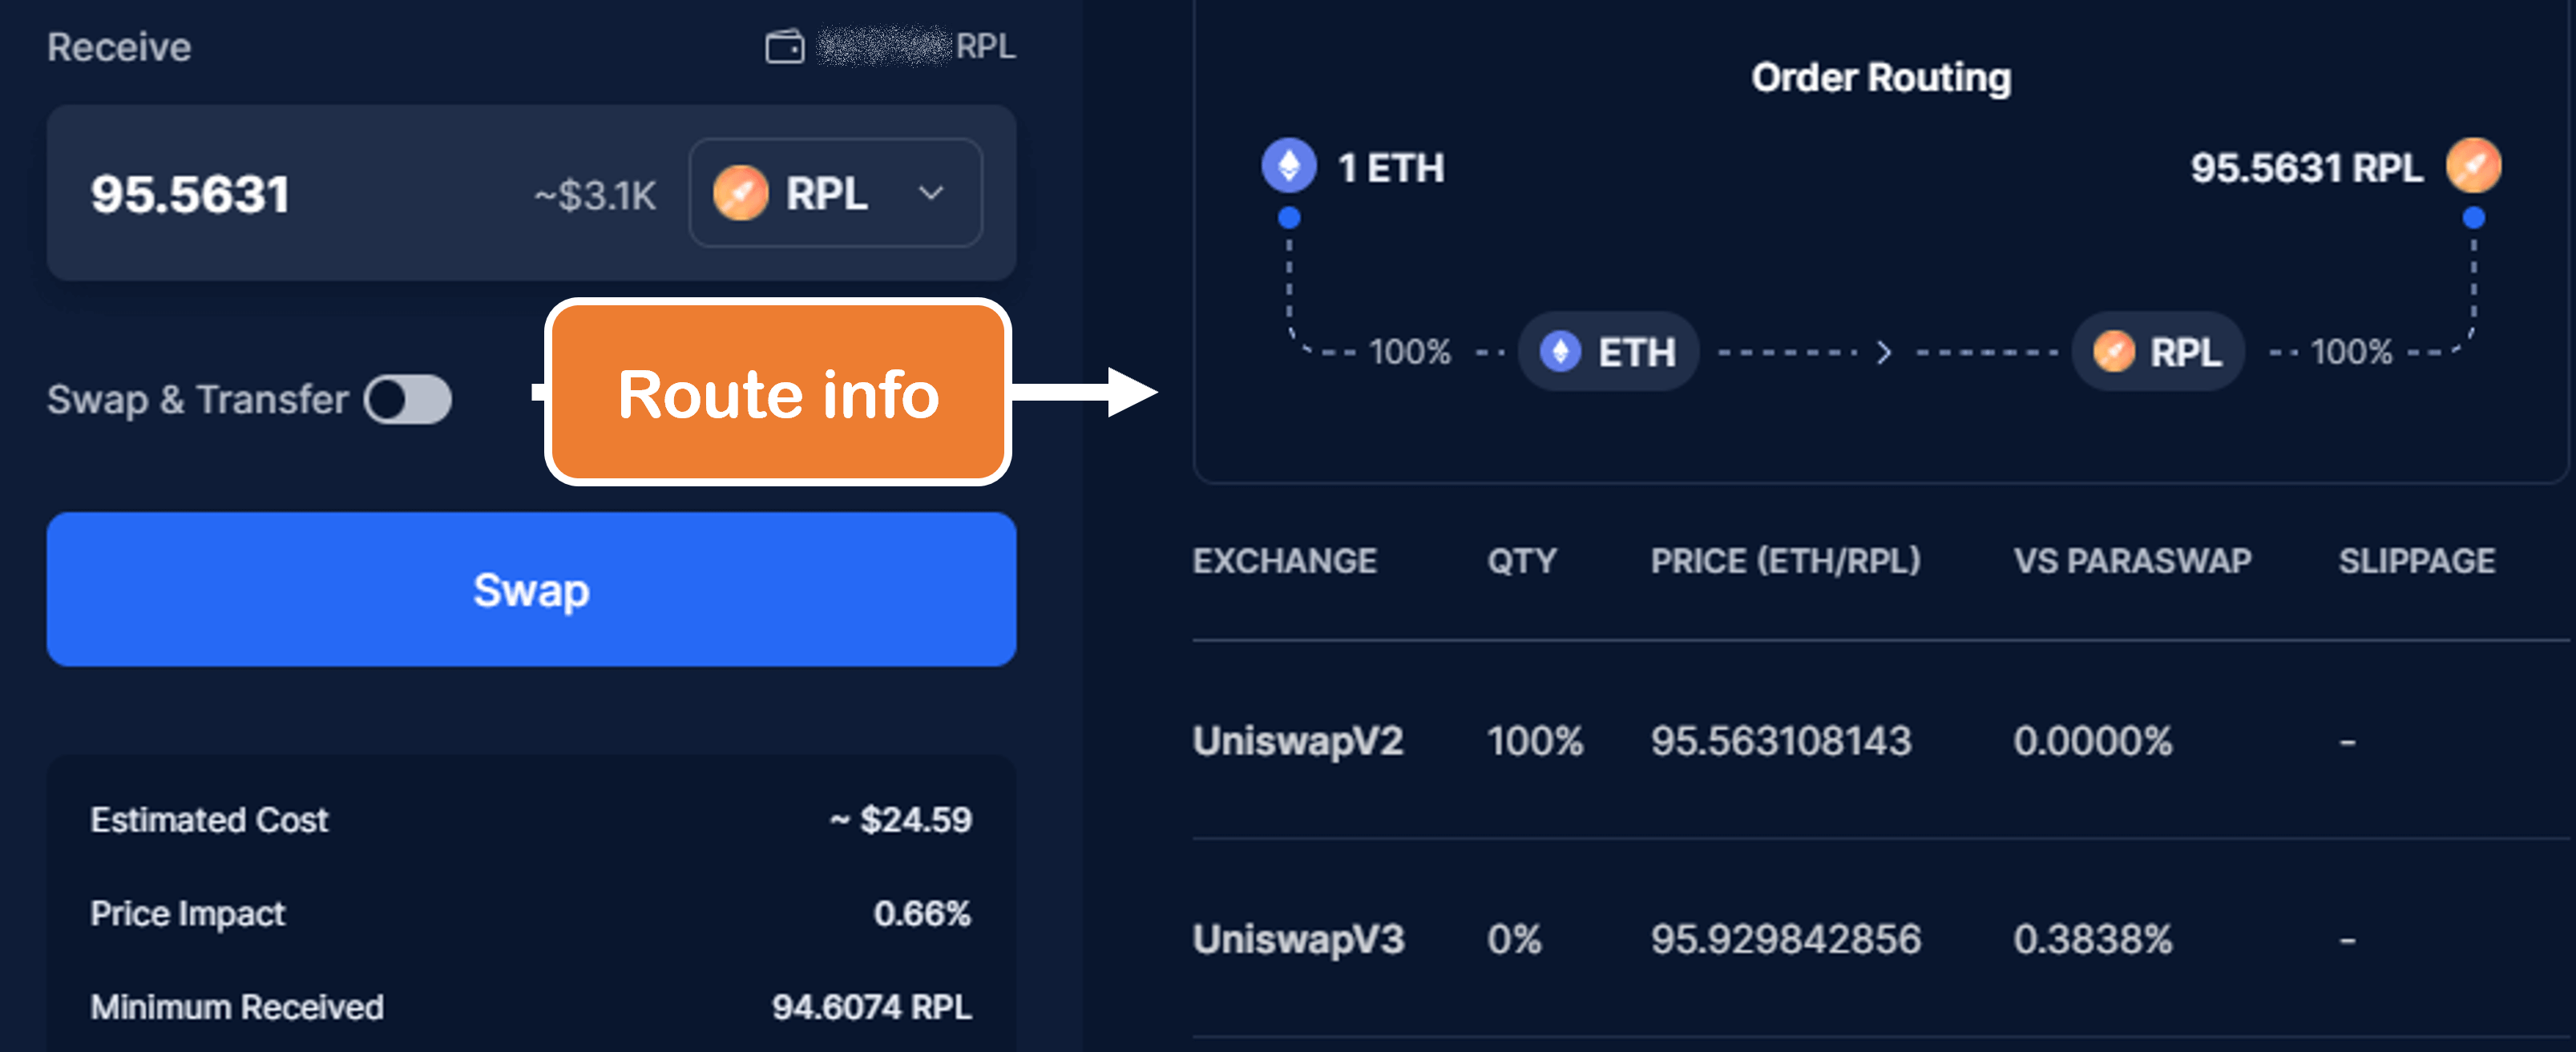
- Check the Order Routing info on the right-side of the page
- WAIT! Before finalizing the order, we want to adjust some of settings to save costs
- Click the slider icon on the top-right of the site

- This is the setting page, we will want to review “Max Slippage” and “Gas Price”
Information on Slippage
Max Slippage defines how much your purchase price can vary from the quoted price; it sets an upper limit on the purchase/sell price.
- When liquidity is low, sandwich bots can more easily raise and lower the RPL price around your transaction, causing you to pay at a higher price than quoted
- Setting a low slippage would mean your transaction would fail if they moved price too much and thus their attack would fail, so they won’t even try it
- If liquidity is high or RPL is not frequently traded, it is not likely that the price will change much during the time of your transaction from natural demand so setting a low slippage is unlikely to cause a trade to fail while still protecting against sandwich attacks
- A good source for liquidity and frequency for the RPL/ETH pair is Uniswap V3 info page
- Generally, >1k RPL/tick or >50 ETH/tick is good liquidity and a trade every 10 minutes or longer is low frequency
- The other settings can be left as default
- Click the slider icon on the top-right of the site
- Set slippage to at least 0.5% and down to 0.1% if RPL volume is still low (see the expandable info above for determining this)
- Note: 0.5% slippage is the safest option for your transaction to succeed but at a higher risk of being sandwich attacked, while 0.1% is the safest option for avoiding a sandwich but at a risk of the transaction failing if you are unlucky enough for another high-priced buy/sell to occur before yours.
- ParaSwap has limited gas options, so select either “Fast” or “Normal”
- If using a wallet that supports EIP1559, then turn-on “Enable EIP1559 Compatibility”
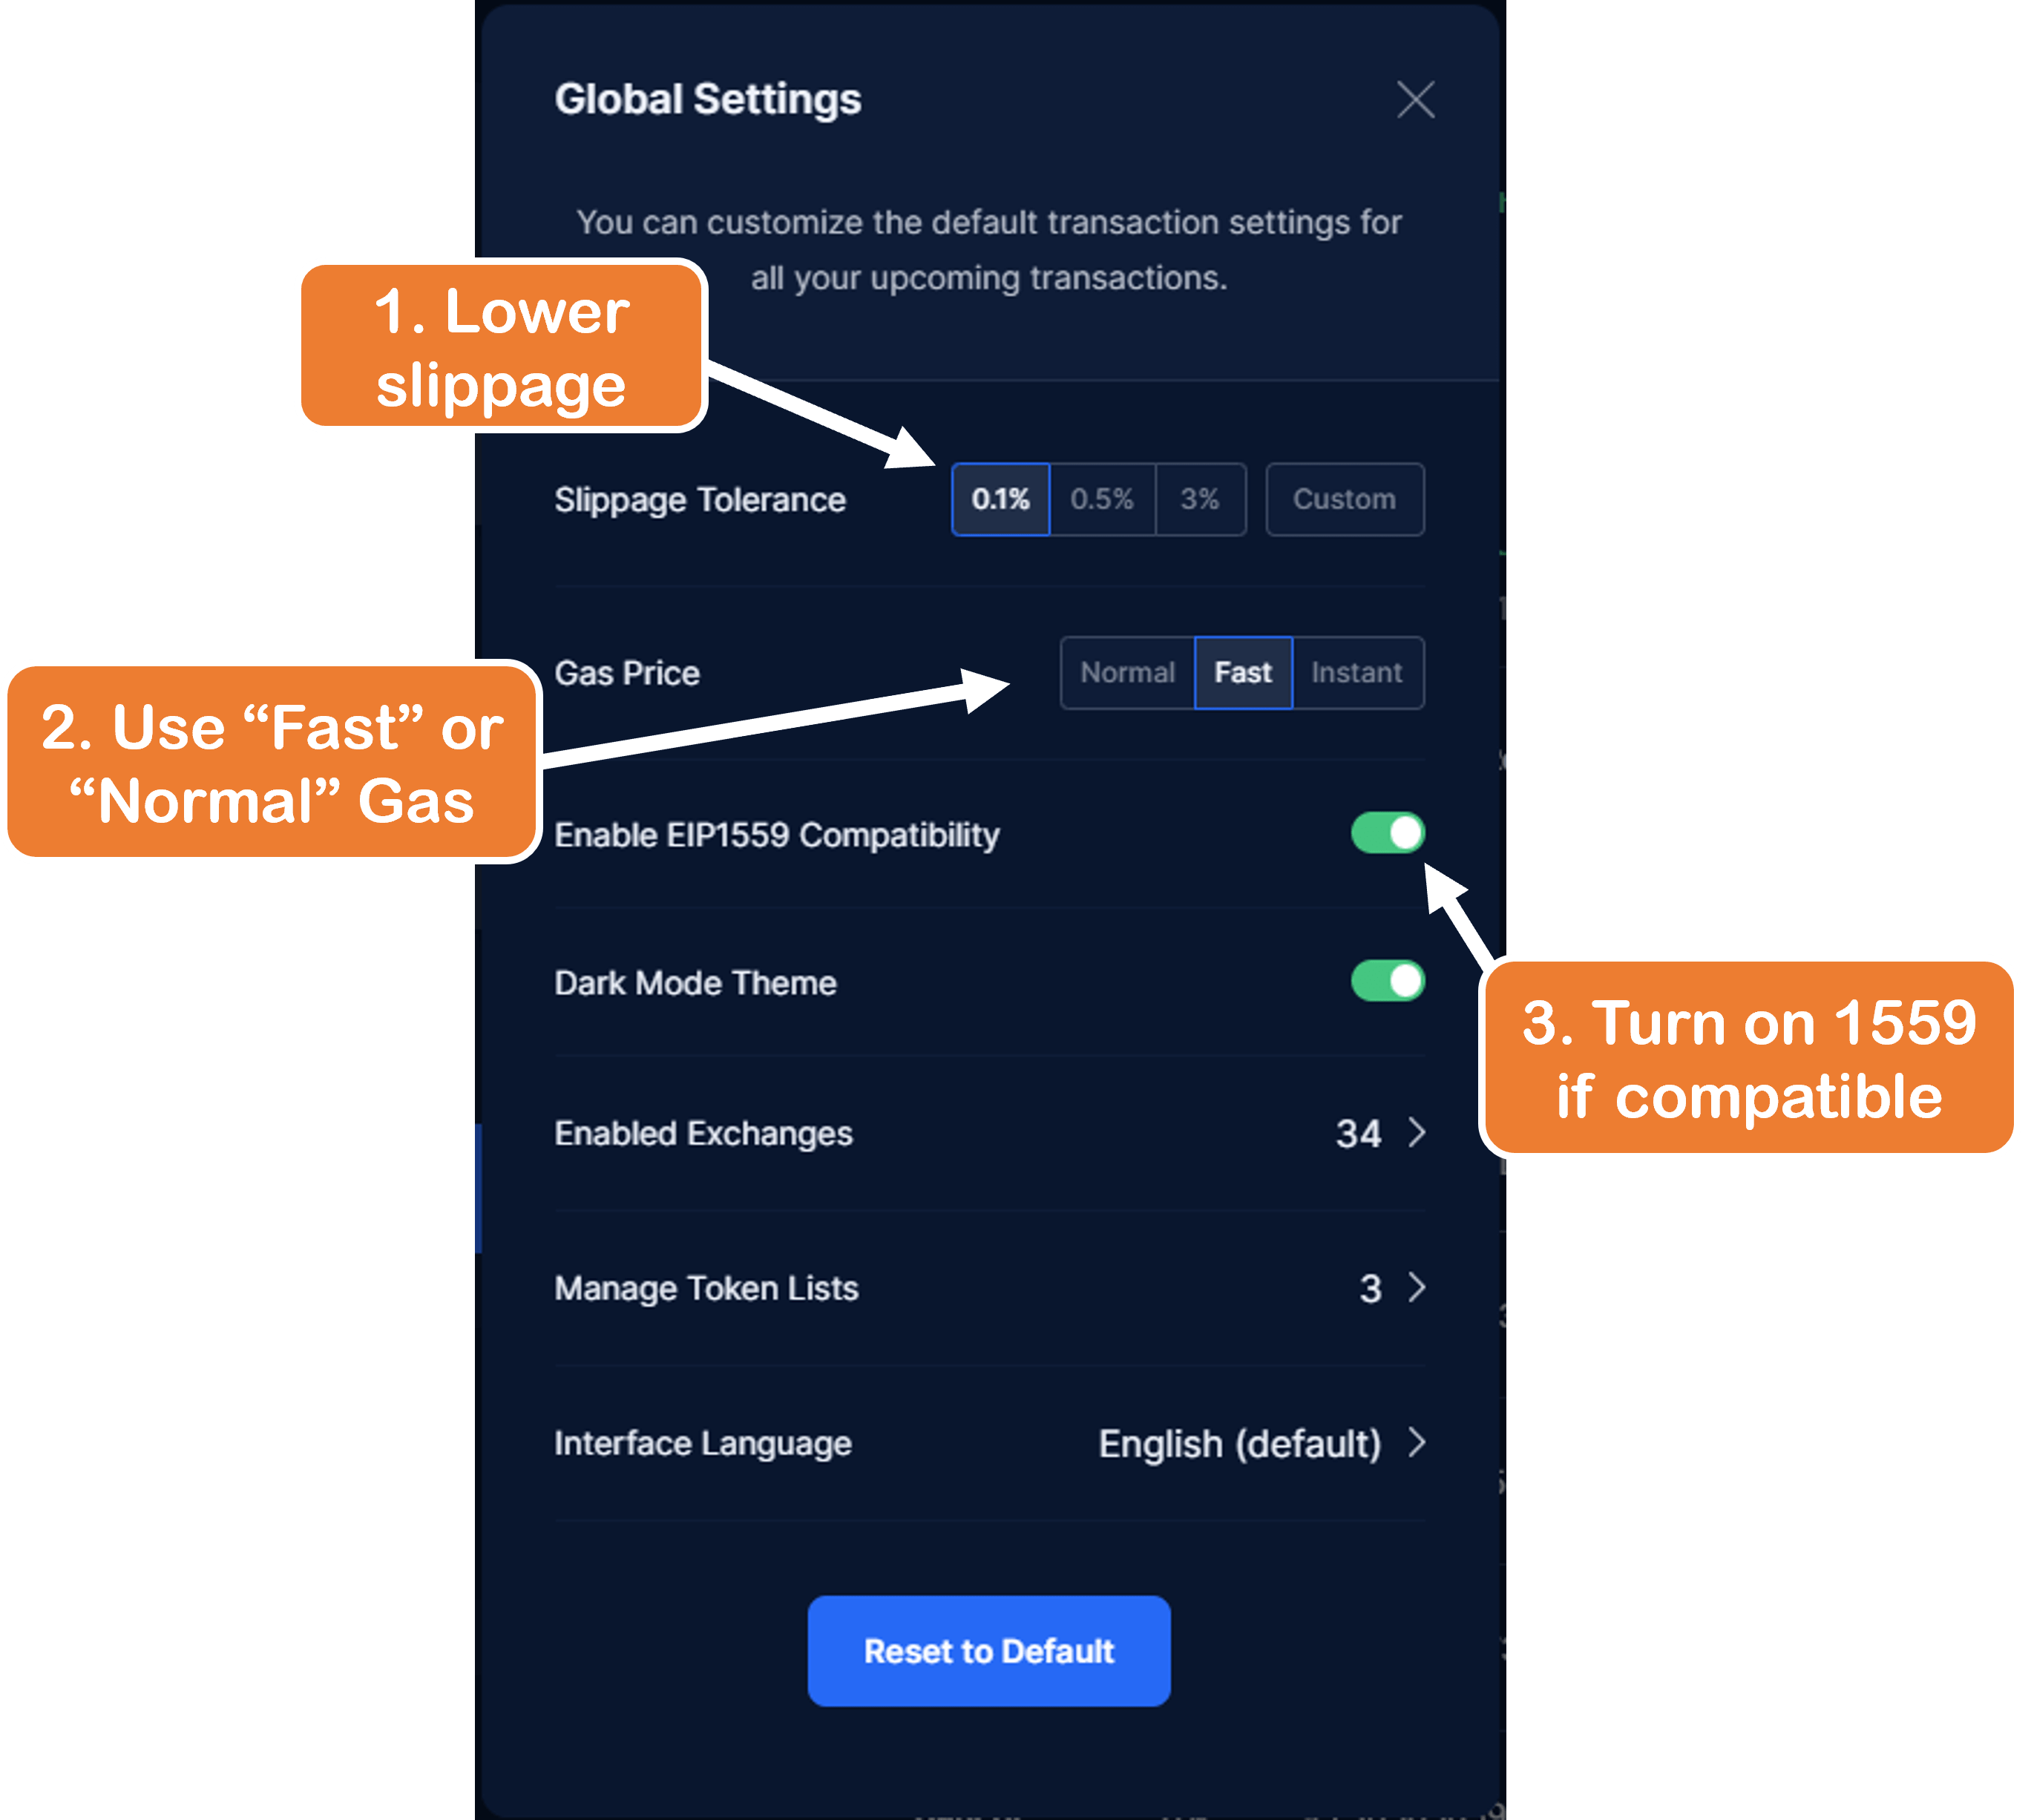
- If using a wallet that supports EIP1559, then turn-on “Enable EIP1559 Compatibility”
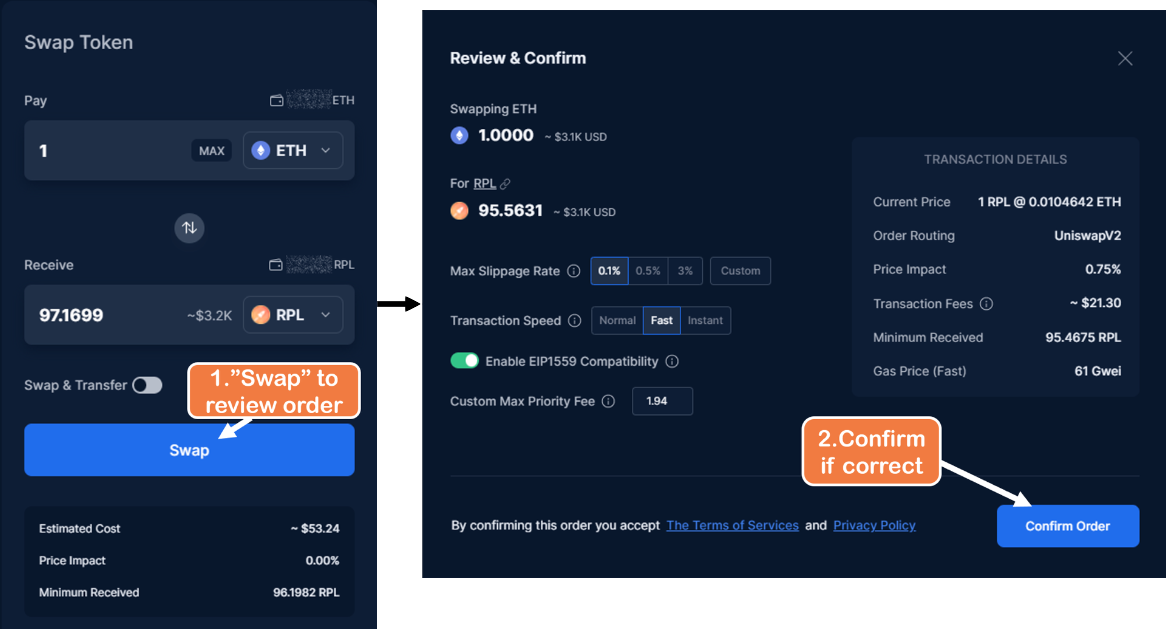
- Leave the settings by clicking the “x” at the top-right
- Click “Swap” and if satisfied, click “Confirm Swap”
- *Note: If you are selling RPL or using a different ERC-20 token to swap to, you will need to approve ParaSwap to transfer it; instead of “Swap” you will see “Unlock
”* {:class="img-fluid"}
- *Note: If you are selling RPL or using a different ERC-20 token to swap to, you will need to approve ParaSwap to transfer it; instead of “Swap” you will see “Unlock
- Review the transaction request from your chosen wallet and sign it if all seems good again